
Introduction
GuestCentrix G-Hub is the browser-based companion to the GuestCentrix property management system. It gives front office and housekeeping teams quick access to the day's guests, rooms and forecasts from a desktop, tablet or phone, without opening the full PMS.
G-Hub reads and updates the same data as GuestCentrix. A room marked clean in G-Hub is clean in the PMS, and a guest checked in at the front desk appears straight away on the housekeeping screens.
Who this guide is for
This guide is for hotel staff who use G-Hub every day: receptionists, duty managers, housekeeping supervisors and room attendants. It walks through each screen in the order it appears in the menu.
About the screenshots
The screenshots in this guide were taken in Demo mode, which shows sample data for a fictional property. Names, rooms, rates and figures are examples only. Your screens show your own property's data and may include your property's logo.
What you need
- A current web browser such as Microsoft Edge, Google Chrome or Safari.
- The G-Hub web address for your property, supplied by your system administrator.
- A G-Hub user name and password. If your property uses two-factor authentication, you also need an authenticator app on your phone.
Modules
Some G-Hub functions need an additional GuestCentrix module to be licensed at your property:
Module | Required for |
|---|---|
GuestCentrix HKeep | All Housekeeping functions: the housekeeping board, My Allocated Rooms, Allocate Attendants, Attendant Progress, Special Requests, Arrivals & Departures, Audit Trail and Room Setup. |
GuestCentrix Repairs & Maintenance | All Repairs & Maintenance functions: the Maintenance screen and reporting a maintenance issue from the housekeeping board. |
If your property does not have a module, the related screens and buttons are not available. Contact CMS Hospitality to add a module.
Note: The menu options you see depend on the permissions your system administrator has given you. If a screen in this guide is missing from your menu, ask your administrator.
Signing in
Logging in
Open the G-Hub web address in your browser. The login screen appears.
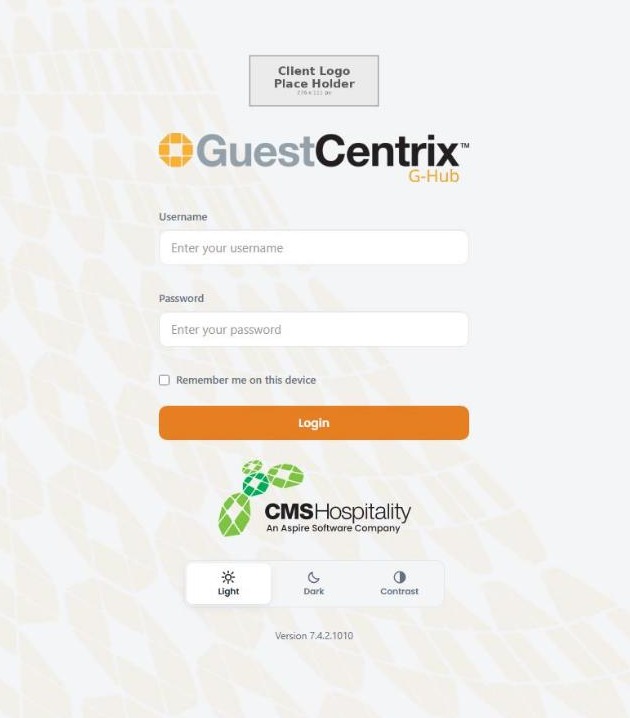
- Enter your Username and Password.
- Tick Remember me on this device if you want G-Hub to remember your user name on this computer or phone. Do not tick it on a shared device.
- Select Login.
If your property uses two-factor authentication, G-Hub asks for a security code next (see Two-factor authentication below). Otherwise the G-Hub start page opens.
The Light, Dark and Contrast buttons below the login form change how G-Hub looks on this device. Your choice is remembered for next time.
Two-factor authentication
Two-factor authentication adds a second check when you log in: as well as your password, you enter a six-digit code from an authenticator app on your phone, such as Google Authenticator or Authy. Your system administrator decides whether it is switched on for your property.
Registering your phone (first login only)
The first time you log in with two-factor authentication switched on, G-Hub shows a QR code to link your authenticator app to your account.
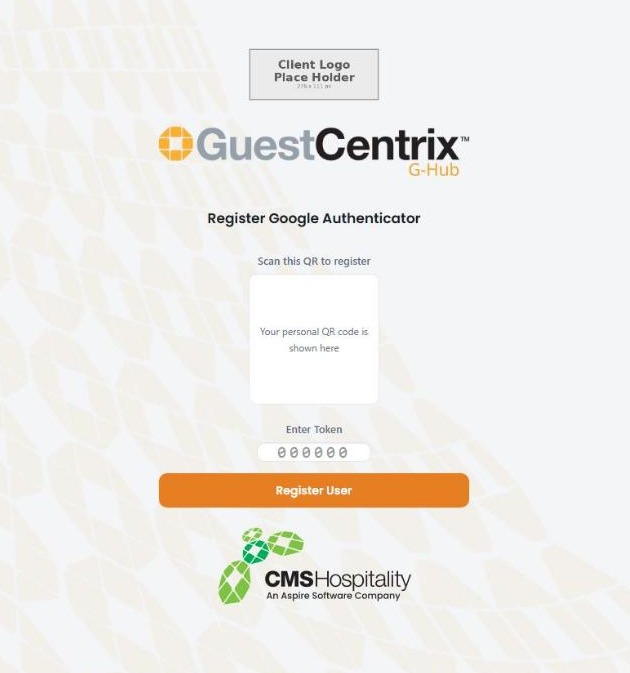
- Open the authenticator app on your phone and choose to add an account.
- Scan the QR code shown on the screen.
- Enter the six-digit code the app now shows in Enter Token.
- Select Register User.
Note: Your QR code is personal to your account. Do not share it or take a photo of it.
Entering your security code
Each time you log in after that, G-Hub asks for the current code from your authenticator app.
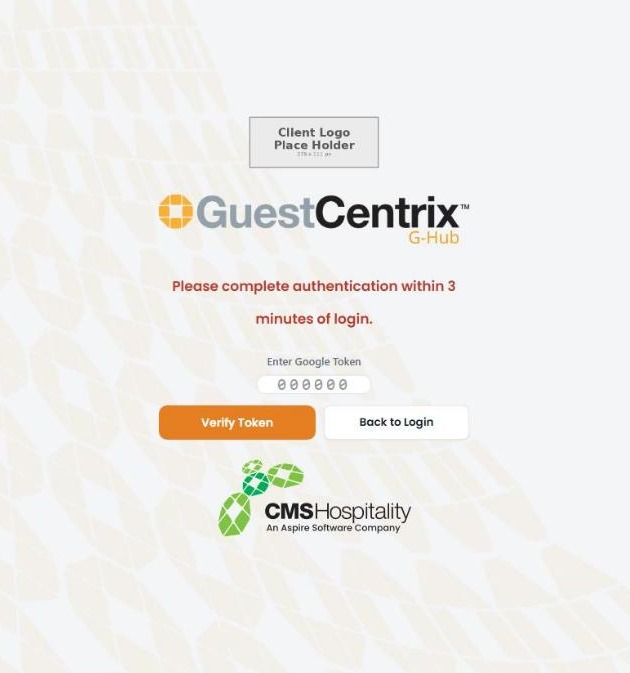
- Open the authenticator app on your phone.
- Type the six-digit code for G-Hub into the token box.
- Select Verify Token.
You must enter the code within 3 minutes of logging in. Codes change every 30 seconds, so if a code is refused, wait for the next one and try again. Select Back to Login to start again with a different user.
Demo mode
Demo mode lets you explore G-Hub with sample data, without a user account. Nothing you do in Demo mode changes real data.
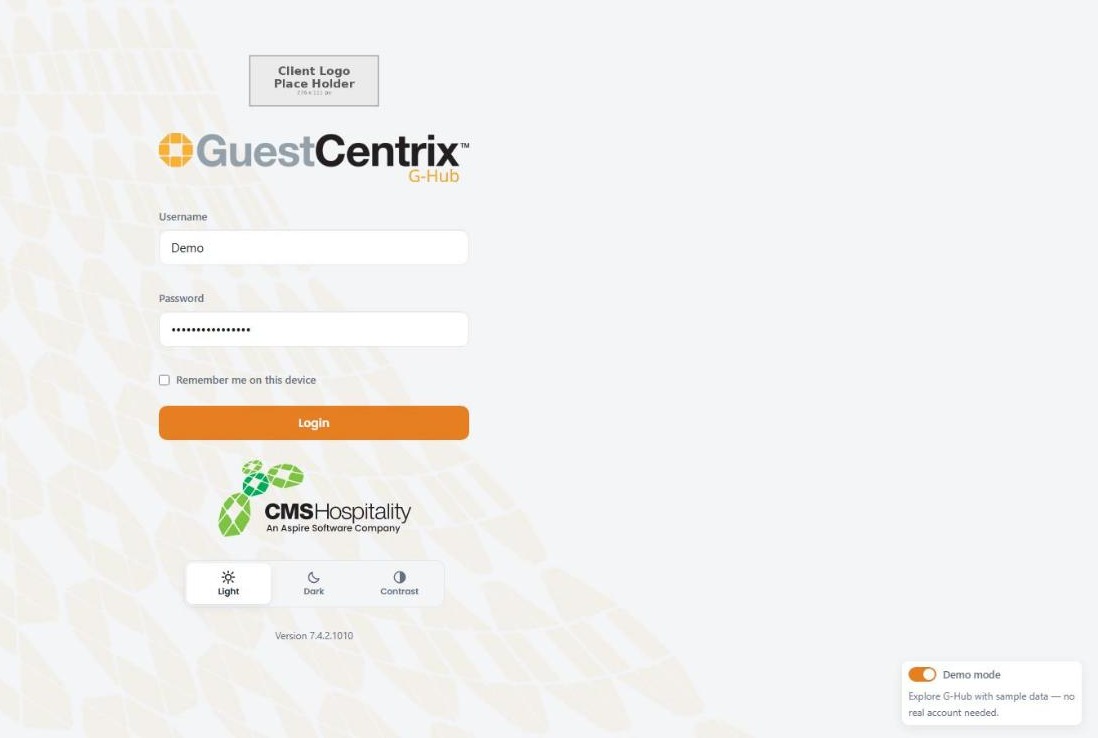
- On the login screen, switch on Demo mode in the bottom right-hand corner. The demo user name and password are filled in for you.
- Select Login. G-Hub opens with an orange DEMO MODE banner across the top of every screen.
- To leave, open the user menu (top right) and select Exit Demo.
Finding your way around
Every G-Hub screen has the same layout: the menu on the left, the screen title and content in the middle, and the property details at the top right.
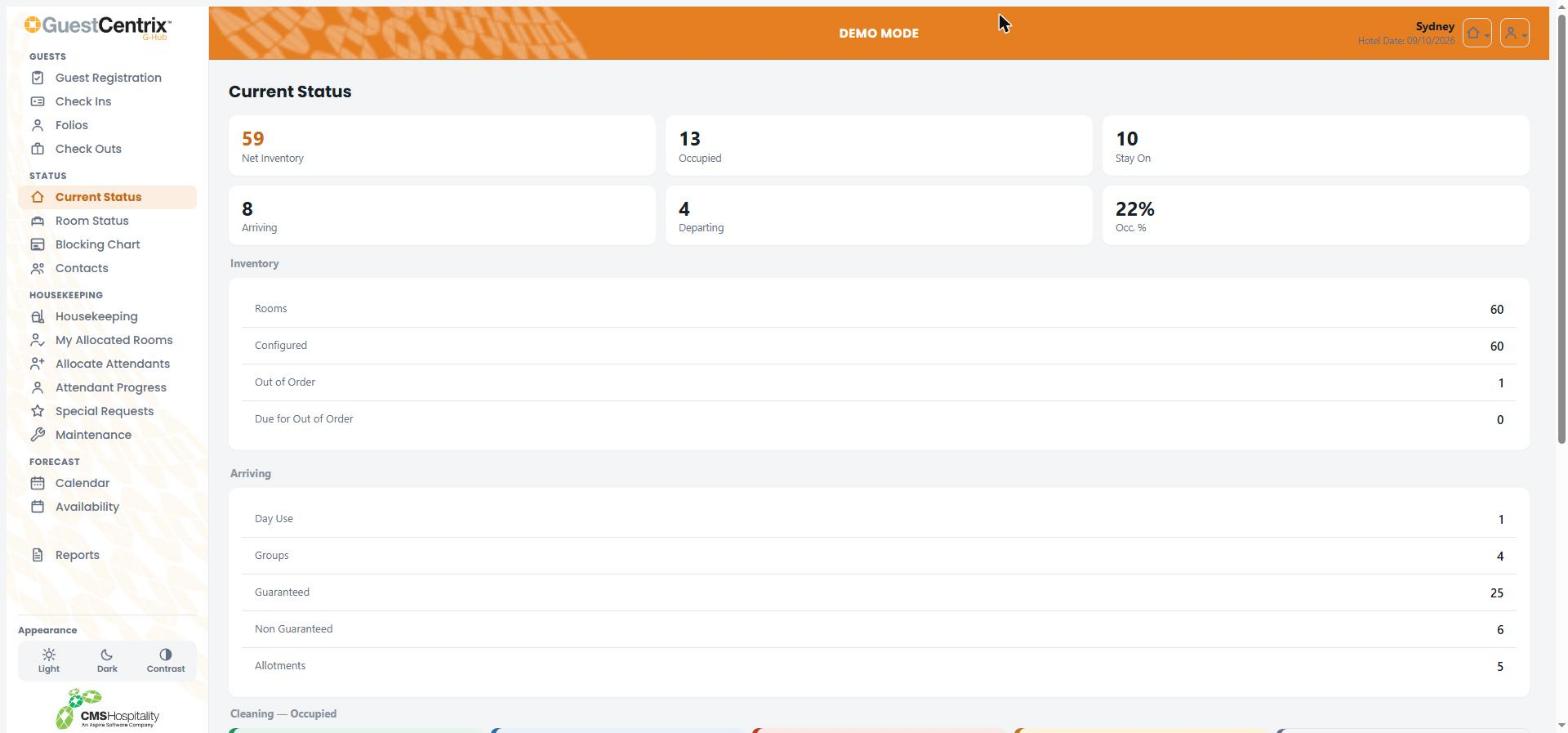
The menu
The menu groups screens by task:
Menu group | Screens |
|---|---|
Guests | Guest Registration, Check Ins, Folios and Check Outs. |
Status | Current Status, Room Status, Blocking Chart and Contacts. |
Housekeeping | Housekeeping, My Allocated Rooms, Allocate Attendants, Attendant Progress, Special Requests and Maintenance. |
Forecast | Calendar and Availability. |
Reports | The property's report library. |
On a phone, the menu is replaced by a bar of shortcuts along the bottom of the screen.
Property and hotel date
The top right of the screen shows the property you are working in and its current hotel date. If you have access to more than one property, select the property button to switch between them.
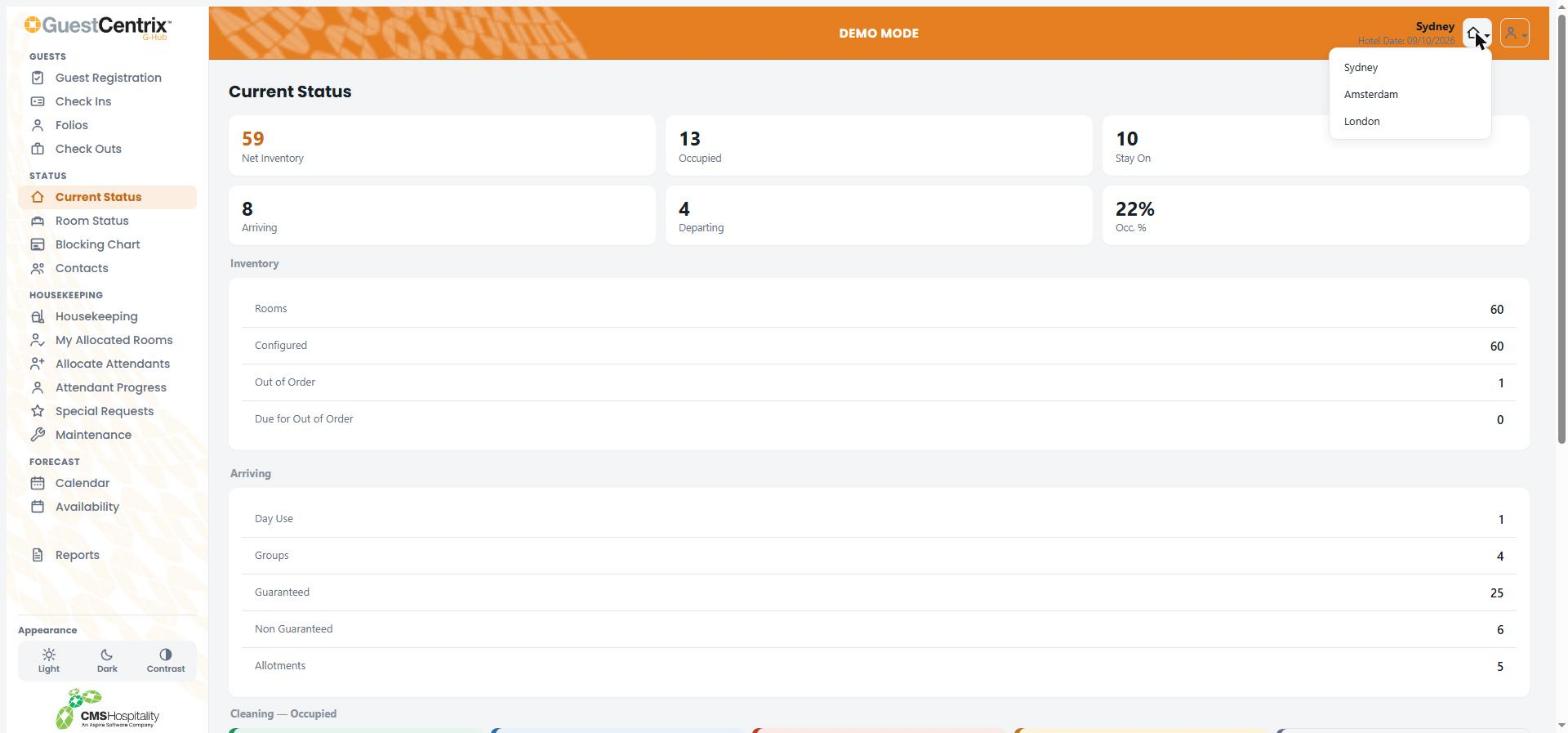
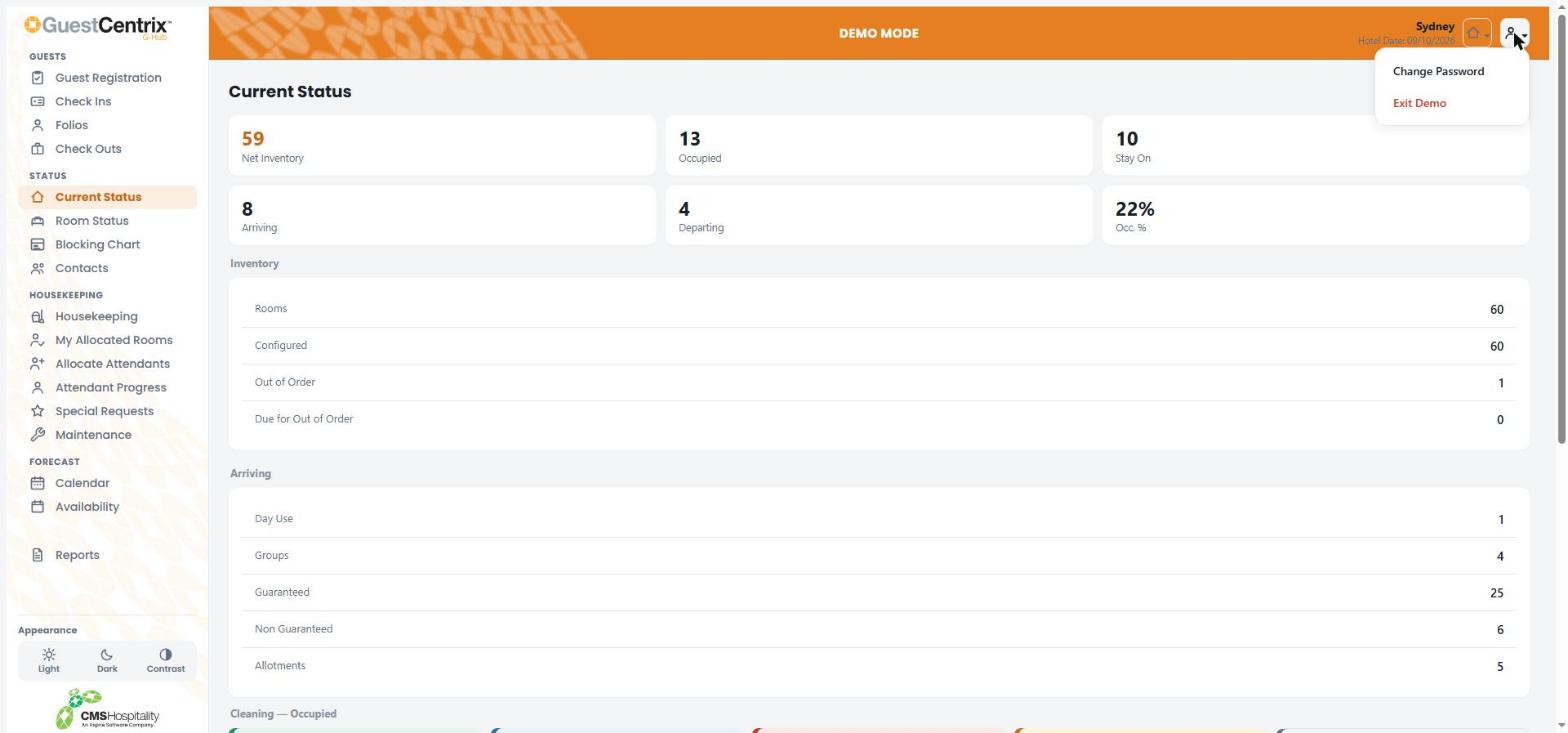
Your user menu
Select the person button at the top right to open your user menu. From here you can change your password or log out.
Appearance
Use Light, Dark or Contrast at the bottom of the menu to change the colour scheme. Contrast uses stronger colours that are easier to read in bright light or for people with low vision.
Searching lists
Most lists have a Search box at the top. Start typing a guest name, room number, folio number or voucher and the list filters as you type.
Guests
Guest Registration
Guest Registration lists today's arrivals so the front desk can complete each guest's registration card, including their signature and photo ID where your property requires it.
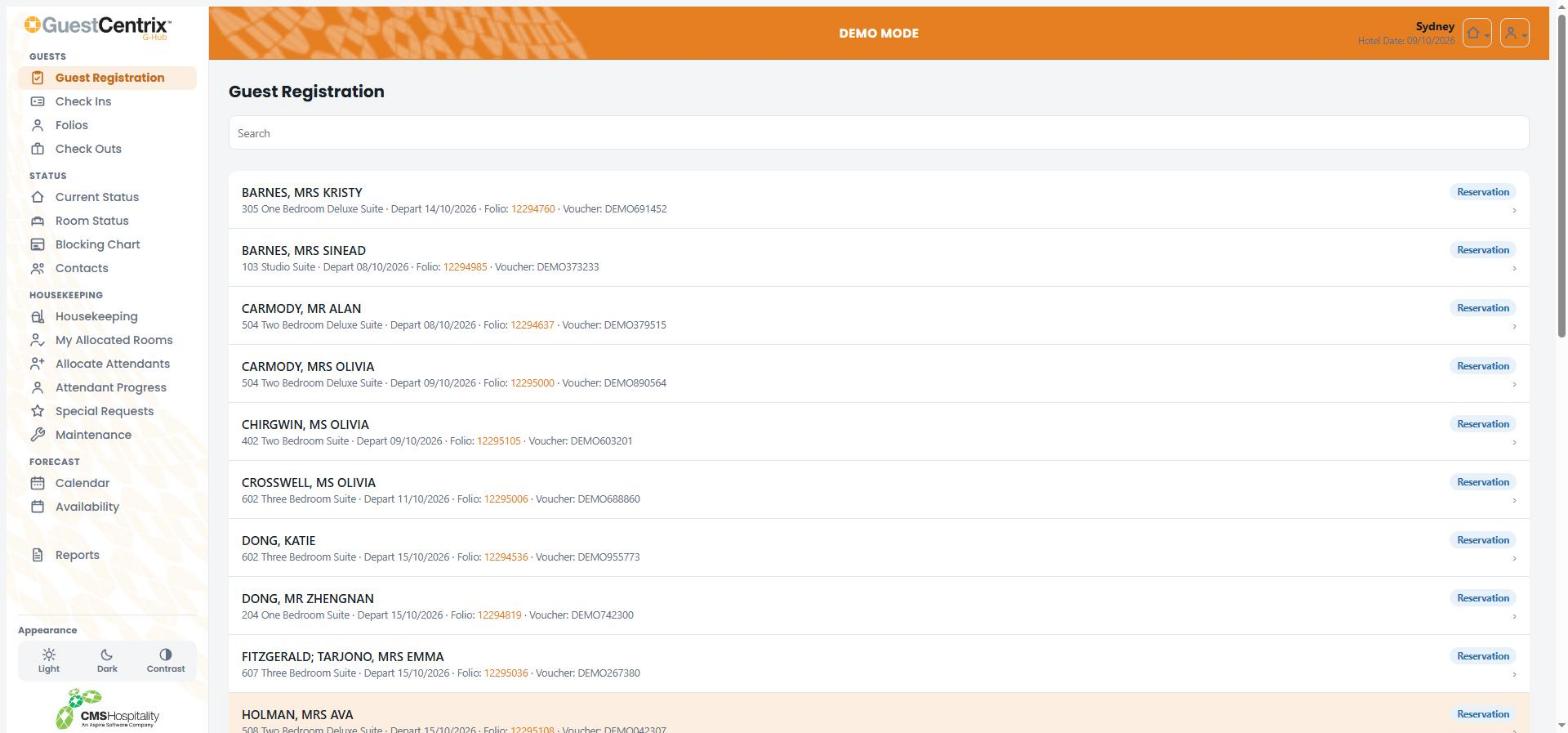
Each row shows the guest name, room, room type, departure date, folio number and voucher. Select a guest to open their registration.
Note: Guest Registration can also run in Kiosk mode on a front desk tablet, so guests can complete their own registration. Where your property uses it, Kiosk mode is started from the user menu. Ask your system administrator about setting it up.
Check Ins
Check Ins lists today's arrivals with everything you need to decide whether a guest is ready to check in.
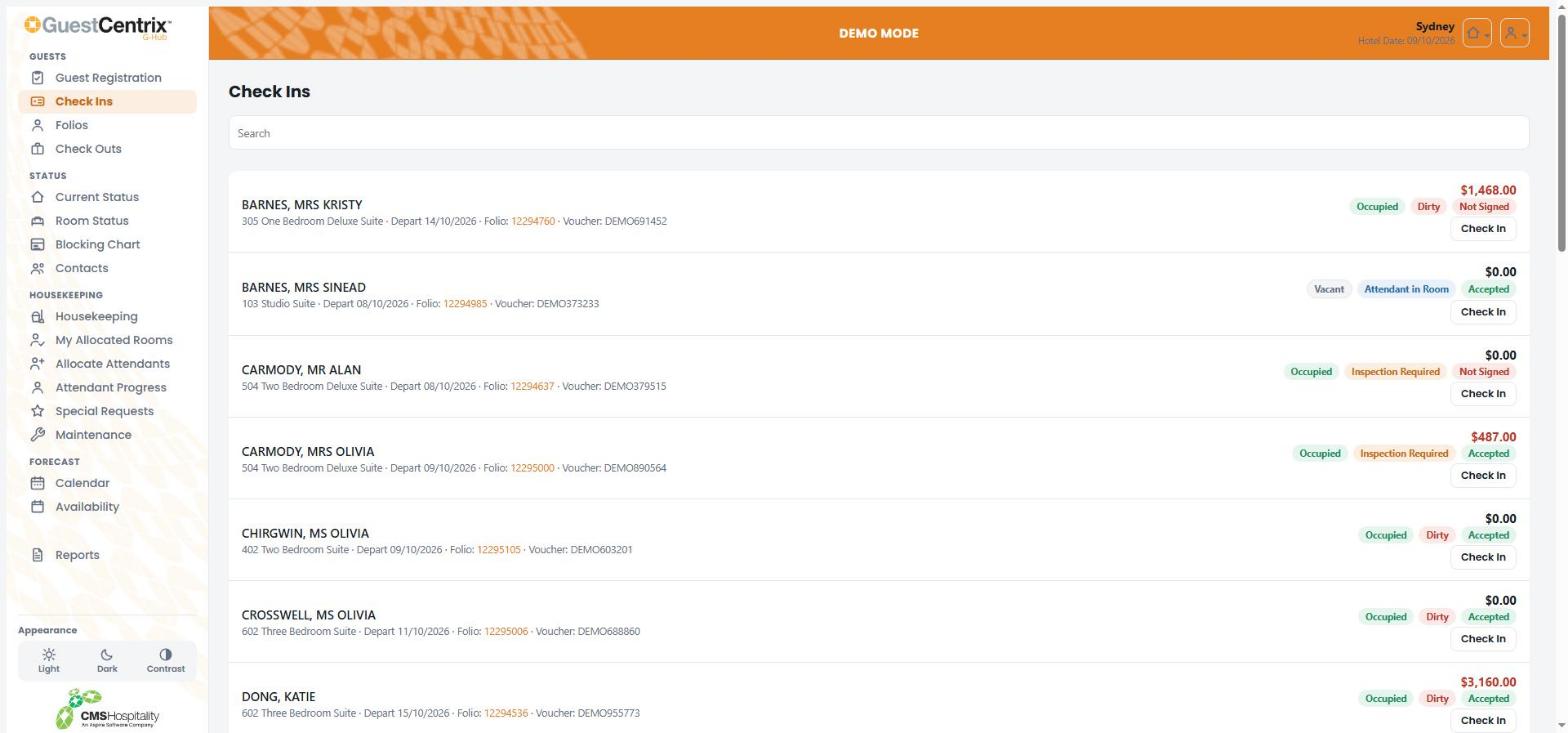
Item | What it shows |
|---|---|
Balance | The amount still to pay. Amounts shown in red are outstanding. |
Room status | Whether the room is Vacant, Occupied or Due Out. |
Attendant status | The housekeeping status of the room, for example Dirty, Attendant in Room, Inspection Required or Clean. |
Registration | Accepted when the guest has signed their registration card, Not Signed when they have not. |
Check In | Opens the check-in screen for the guest. |
Checking in a guest
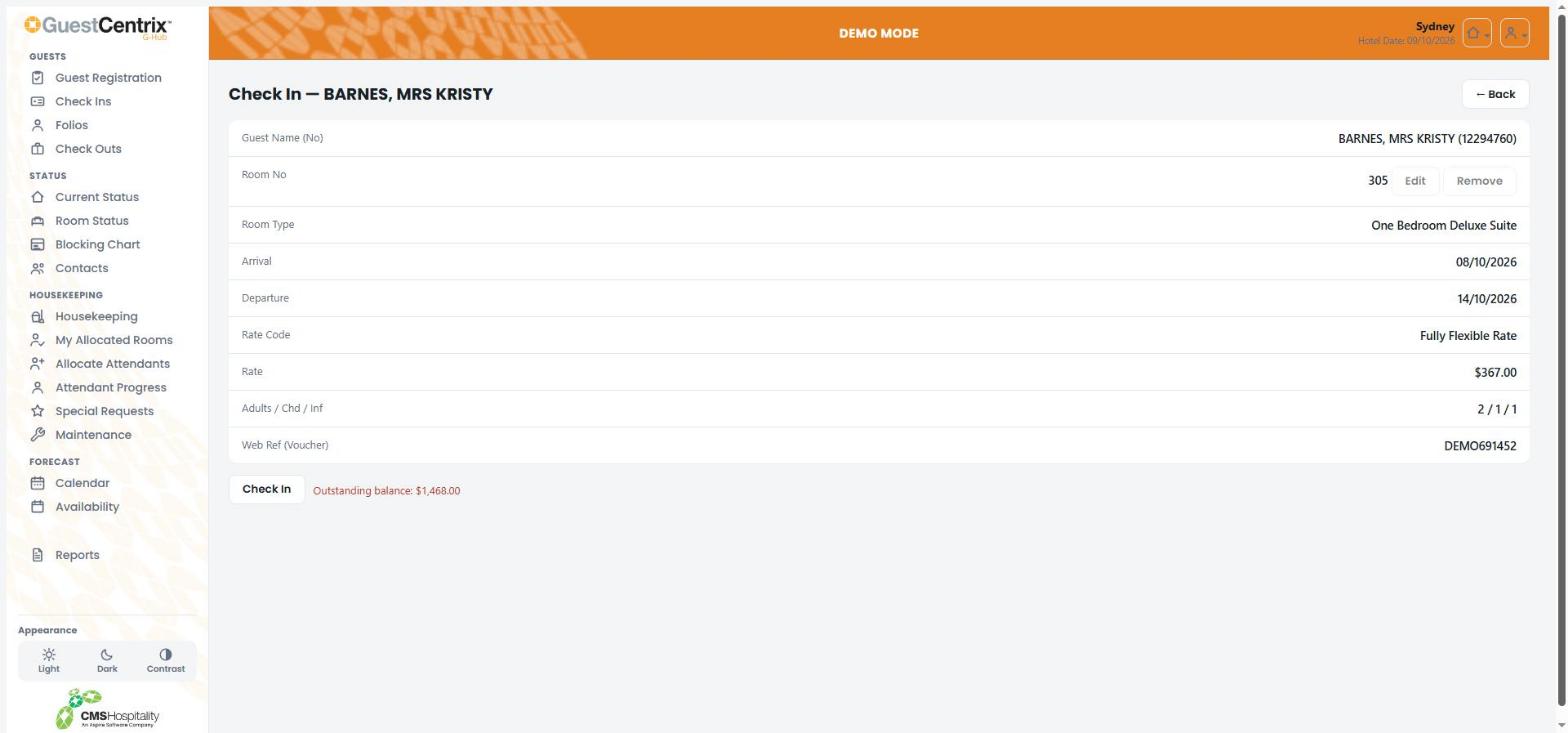
- Select Check In on the guest's row.
- Check the room, room type, dates, rate and guest numbers.
- If you need a different room, select Edit next to the room number and choose another room. Select Remove to clear the room.
- Select Check In.
If the folio has an outstanding balance, G-Hub shows the amount next to the Check In button so you can take payment first.
Folios
Folios lists guests by stage of stay. Use the tabs at the top to switch between Arriving, In House and Departing.
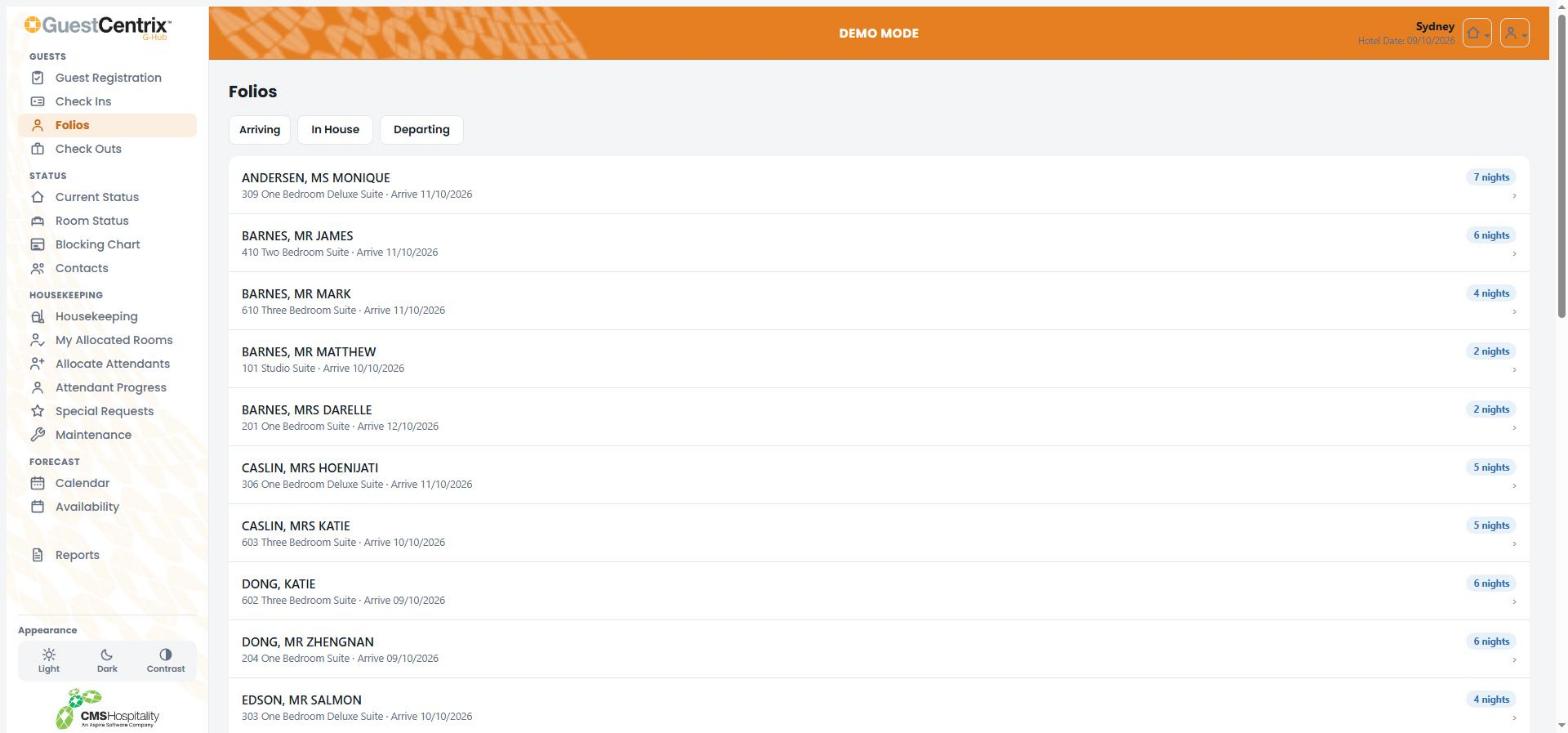
Select a guest to open their folio details.
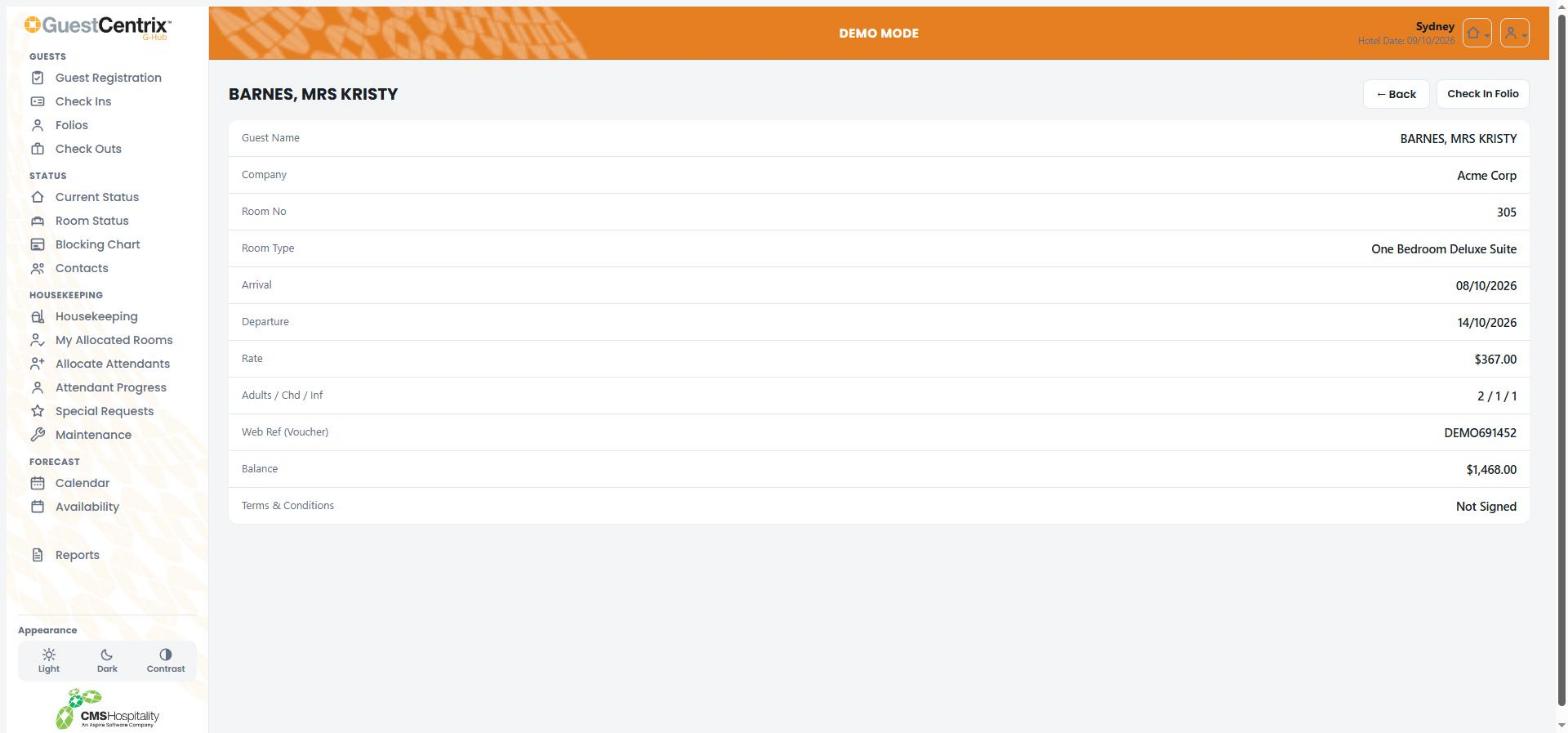
The folio shows the guest and company, room, dates, rate, number of guests, voucher, balance and whether the terms and conditions have been signed. Select Check In Folio to go to the check-in screen, or Back to return to the list.
Check Outs
Check Outs lists guests due to depart today, with their balance, room status, attendant status and registration status.
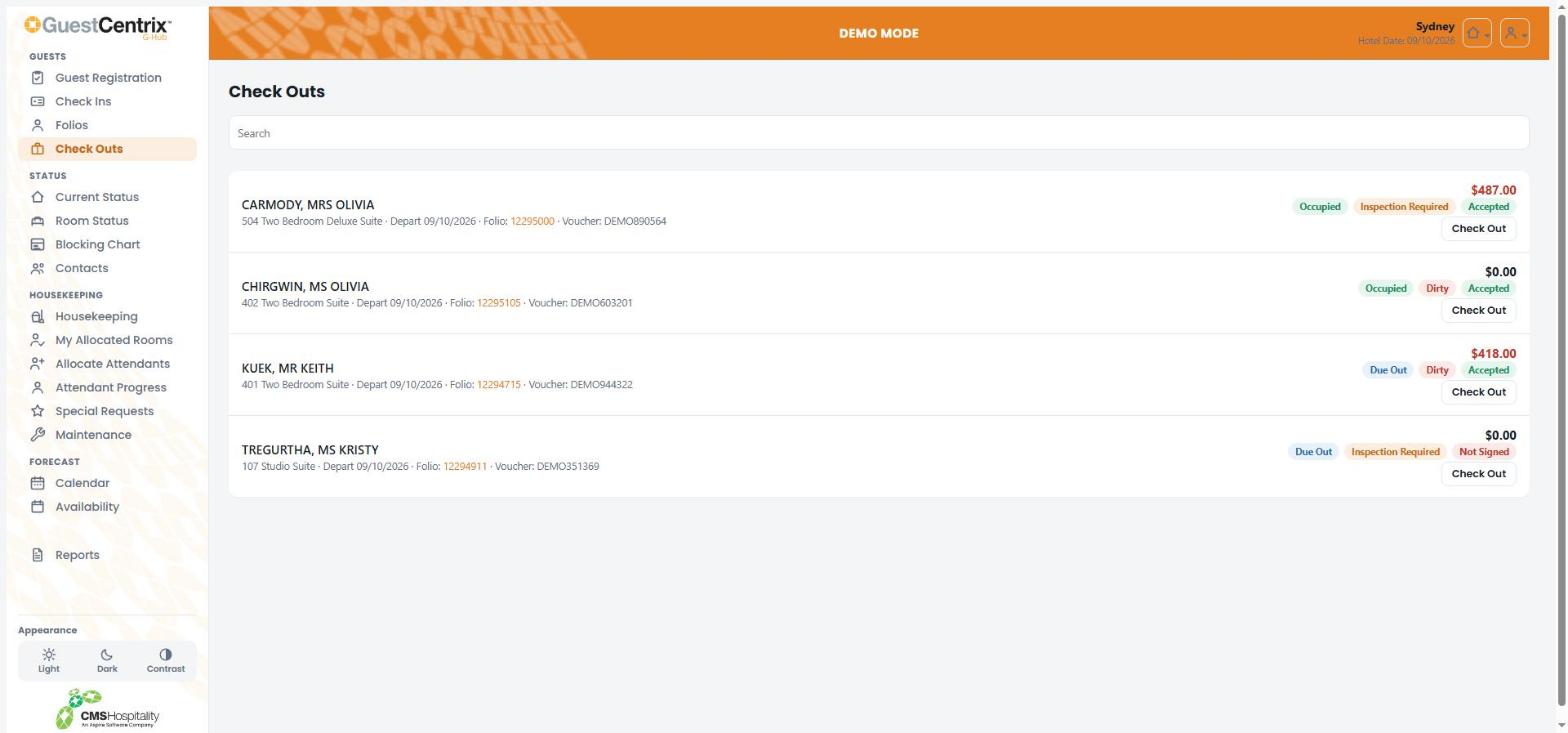
- Check the guest's balance. Amounts shown in red still need to be paid.
- Select Check Out on the guest's row.
- Confirm the check-out when asked.
Status
Current Status
Current Status is a snapshot of the property for the hotel date.
- The tiles across the top show net inventory, rooms occupied, stay-ons, arrivals, departures and occupancy percentage.
- Inventory shows total rooms, configured rooms and rooms out of order.
- Arriving breaks today's arrivals down by day use, groups, guaranteed, non-guaranteed and allotments.
- Further down, the cleaning summary shows how many occupied and vacant rooms are at each housekeeping stage.
Room Status
Room Status lists every room with its floor, room type, exposure, current status, attendant status and features such as non-smoking and disabled access.
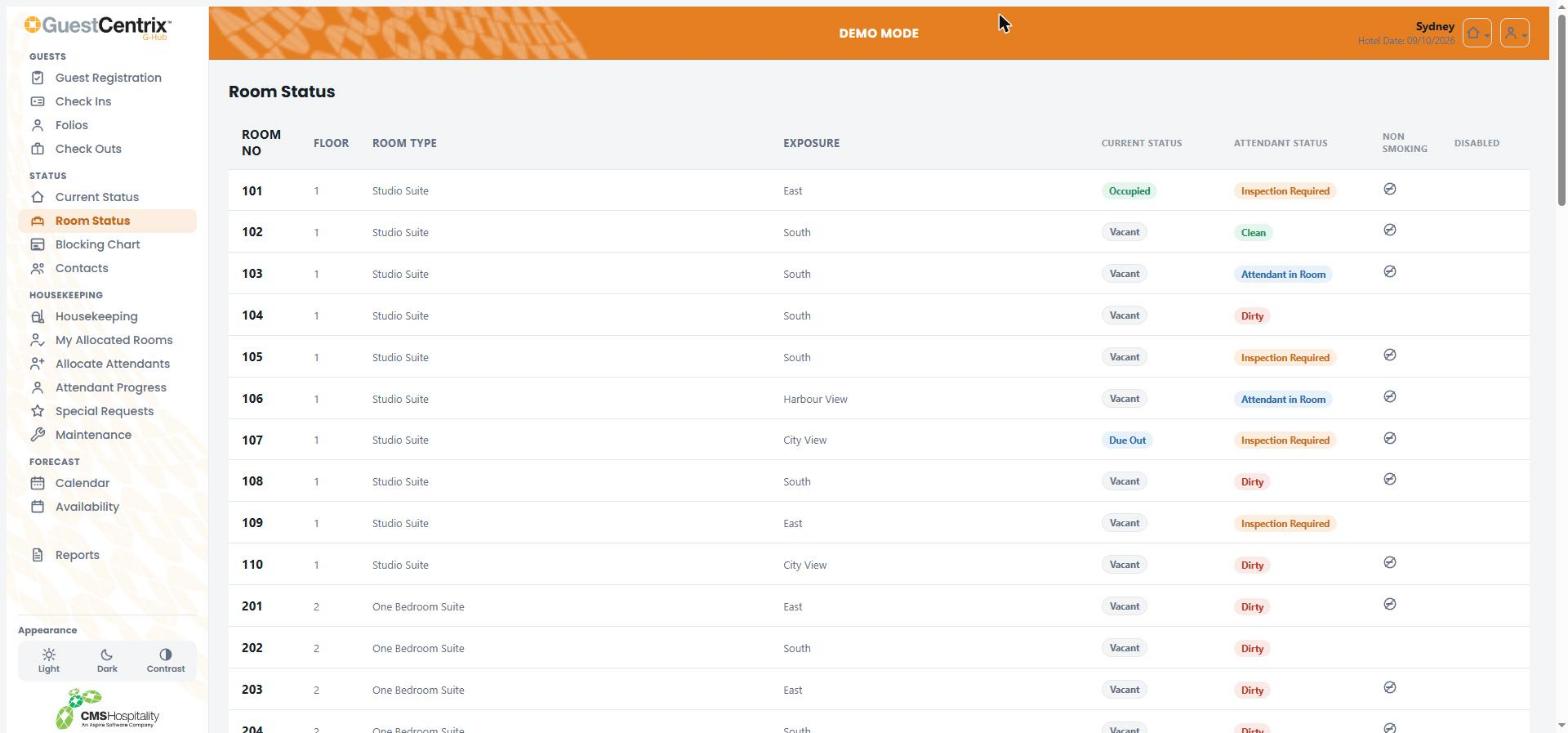
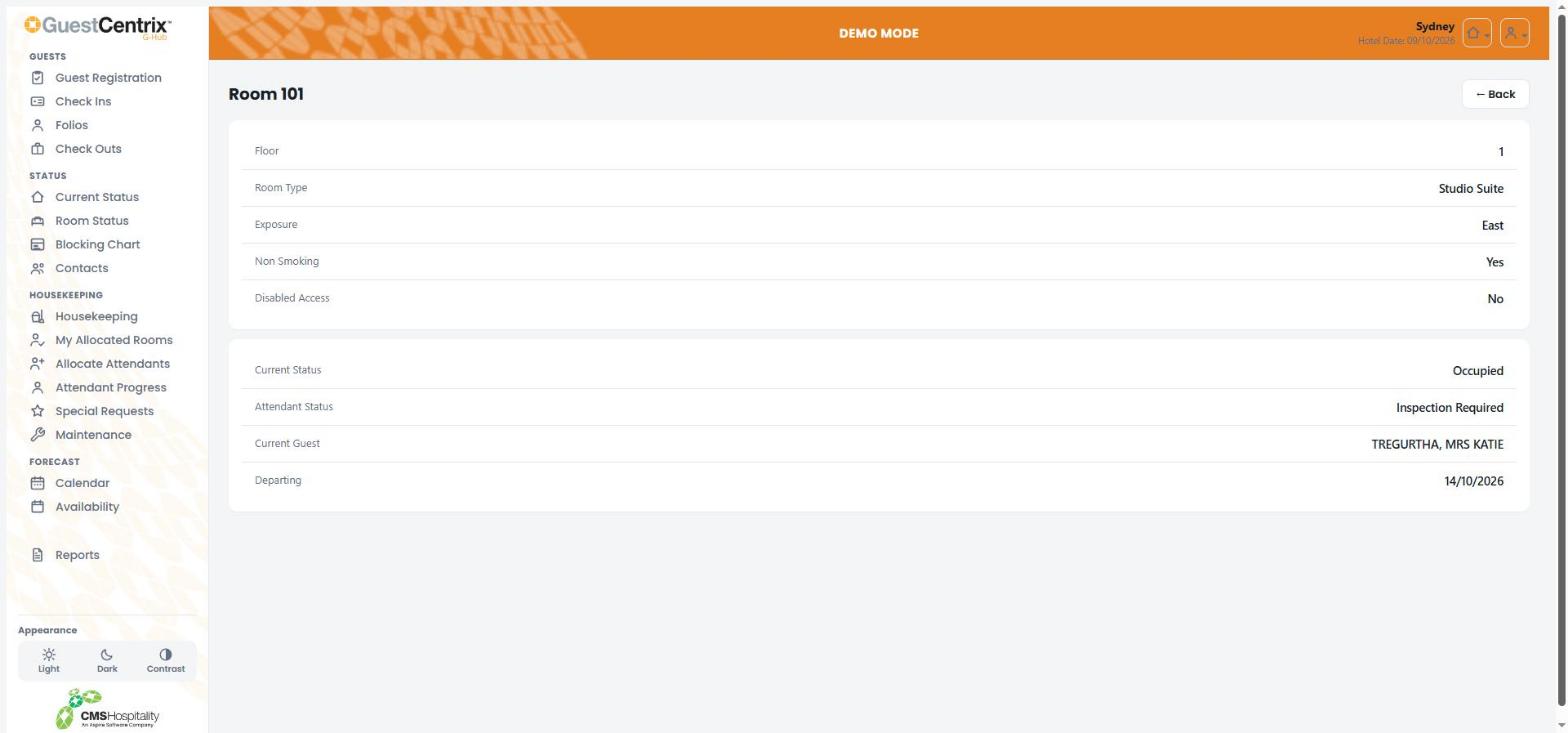
Use the filters above the list to show one floor, room type, current status or attendant status, or tick Vacant & Clean to see rooms ready to sell. Select Reset All to clear the filters. Select a room to see its details.
Blocking Chart
The Blocking Chart shows which guest is in each room across the next two weeks. Each bar is a booking, showing the guest name and folio number.
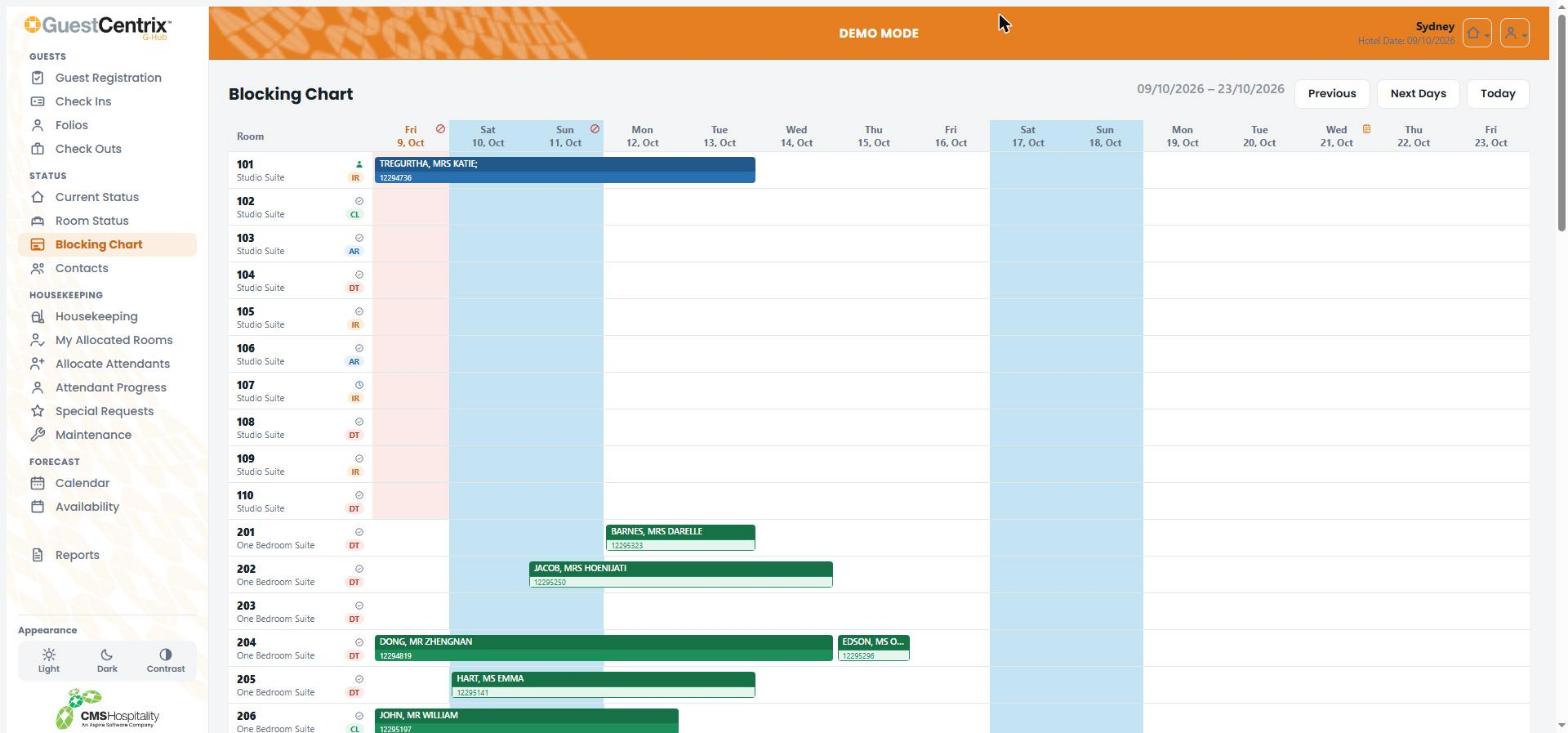
- Use Previous and Next Days to move through the dates, and Today to return to the hotel date.
- Weekends are shaded blue. Icons in the date headings mark diary notes and stop-sell days.
- The letters under each room number show its housekeeping status, for example DT (dirty), CL (clean), AR (attendant in room) and IR (inspection required).
Contacts
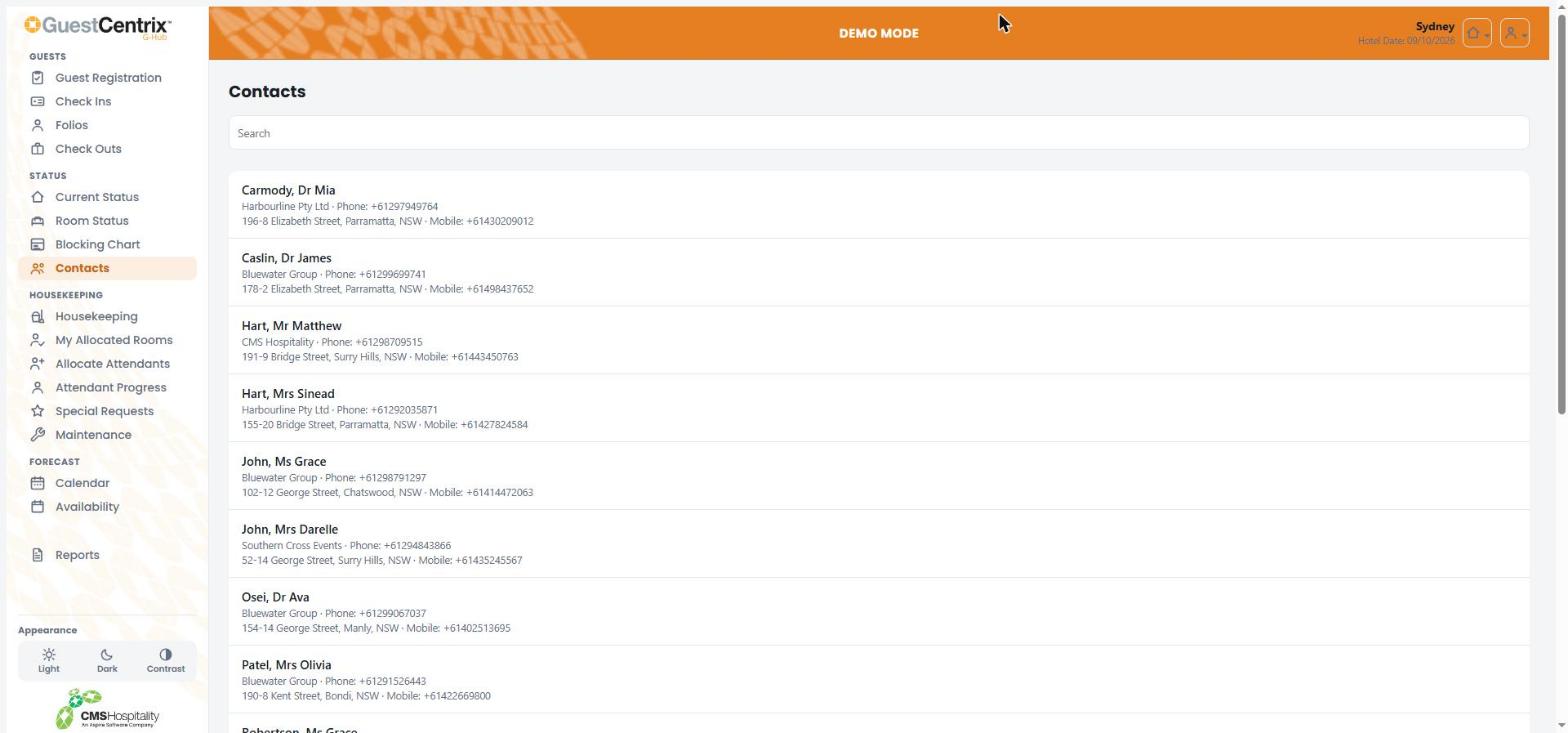
Contacts lists the property's contacts with their company, phone, mobile and address. Use Search to find a contact by any of these details.
Housekeeping
Note: The Housekeeping functions require the GuestCentrix HKeep module.
The housekeeping screens share a row of tabs at the top, so you can move between them quickly: Board, Special Requests, Allocate Attendants, Attendant Progress, Maintenance, Arrivals & Departures, Audit Trail and Room Setup.
Housekeeping board
The board shows every room and lets you update its housekeeping status.
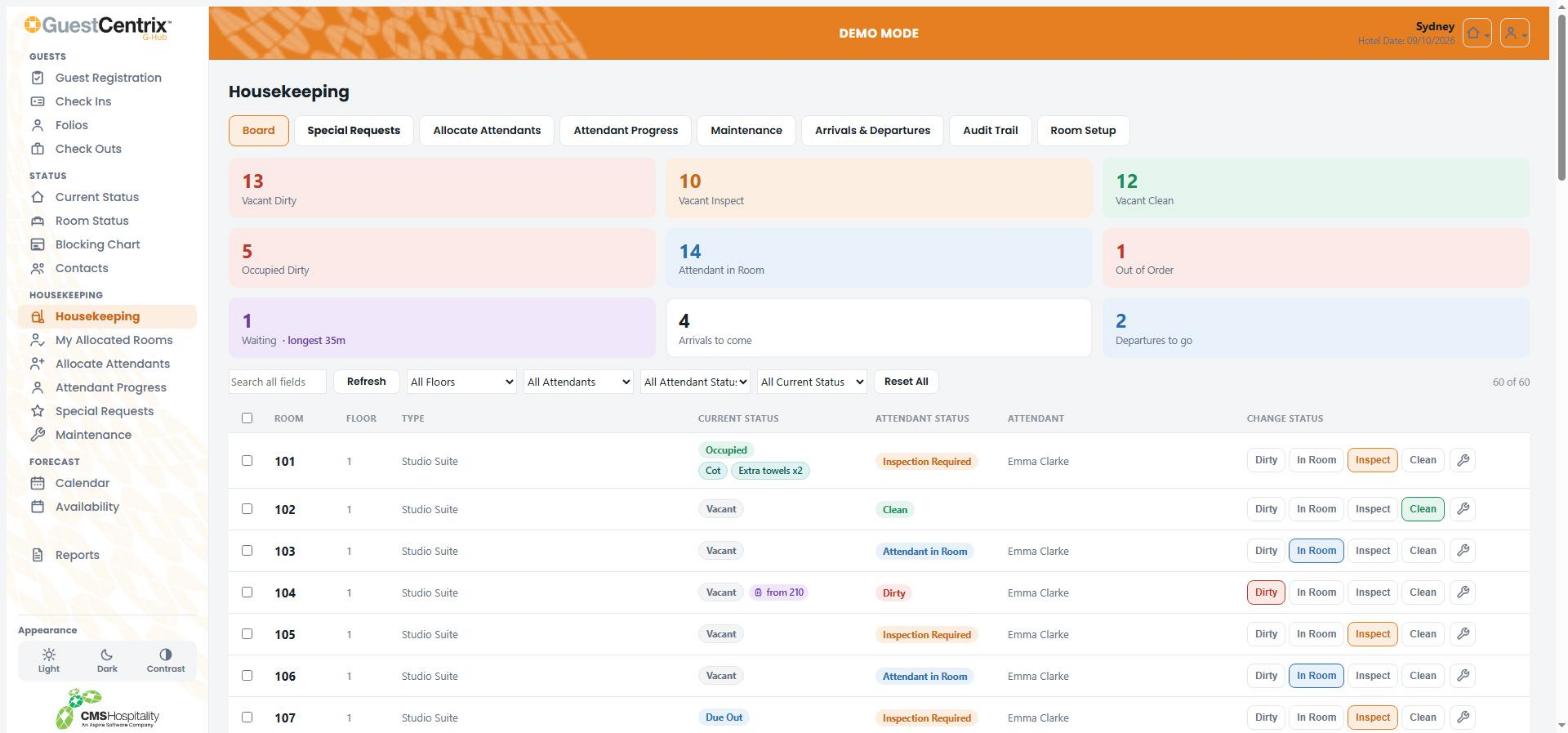
- The coloured tiles at the top count rooms by status. Select a tile to show just those rooms.
- Use the filters to show one floor, attendant, attendant status or current status. Search all fields finds a room, guest or request.
- Badges under the current status show special requests for today, such as a cot or extra towels, and guests due into the room.
Changing a room's status
- Find the room on the board.
- Under Change Status, select Dirty, In Room, Inspect or Clean. The highlighted button is the room's current status.
- To change several rooms at once, tick them and use the buttons at the top of the board.
Select the spanner button on a room to report a maintenance issue for it. This requires the GuestCentrix Repairs & Maintenance module.
Note: If the connection drops, G-Hub holds your changes on the device and sends them as soon as it is back online.
My Allocated Rooms
My Allocated Rooms is the room attendant's view. It shows only the rooms allocated to you today, with a progress bar and a count of rooms at each status.
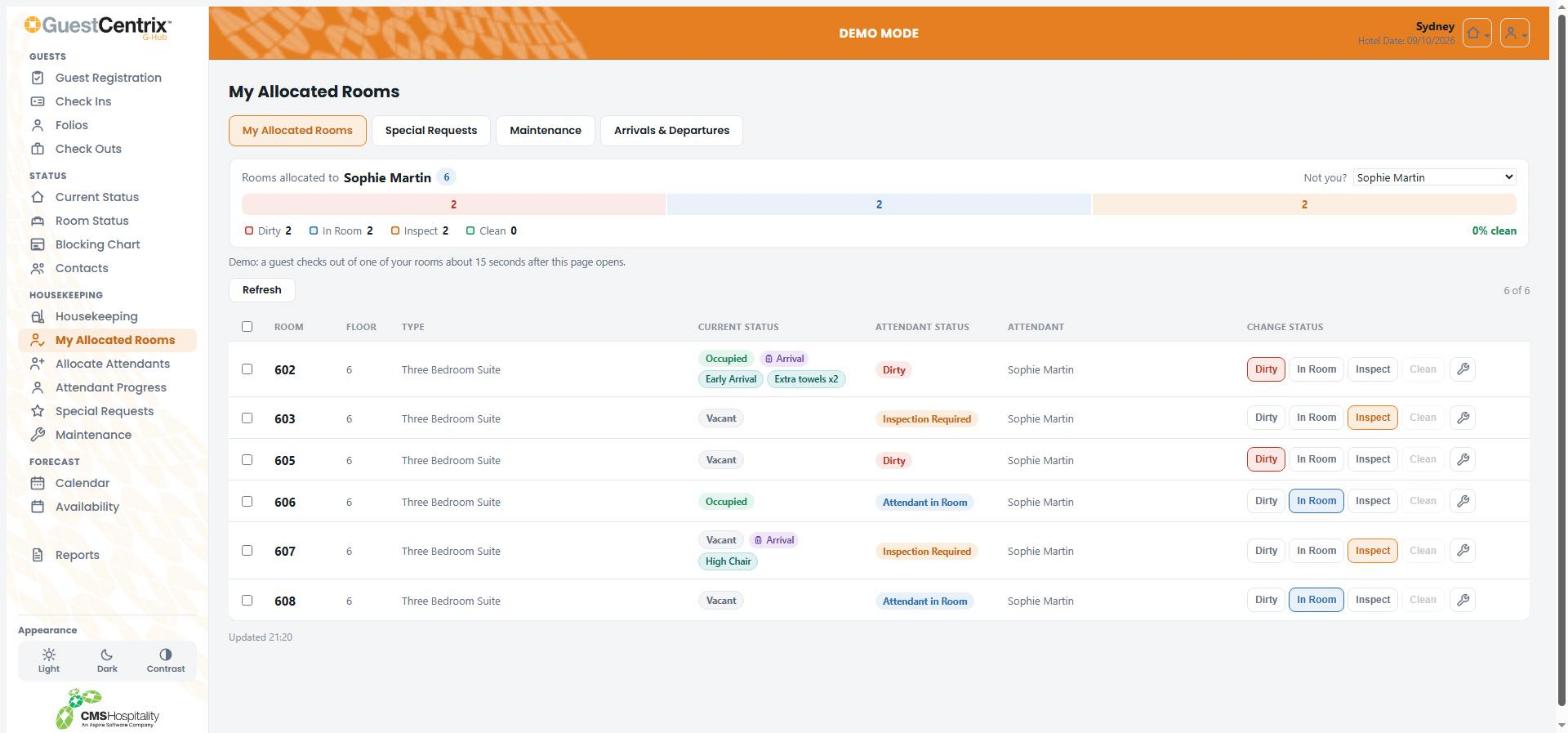
G-Hub matches you to your attendant name automatically. If it shows the wrong name, select yours from Not you? and G-Hub remembers it on this device. Change each room's status as you work, in the same way as on the board.
Special Requests
Special Requests lists today's housekeeping requests, such as cots, extra towels or early arrivals, with the room, guest, stay dates and attendant.
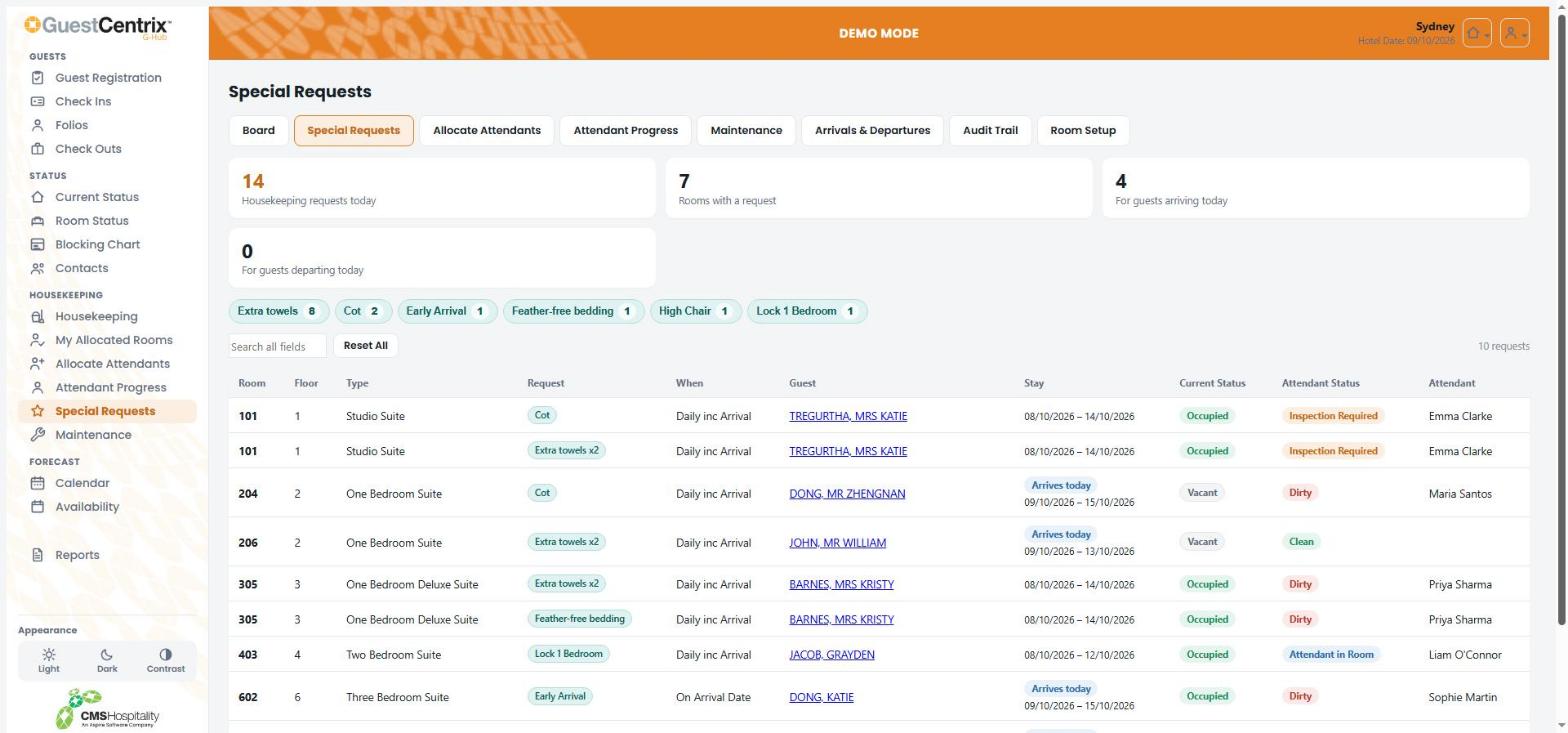
The chips above the list total each type of request. Select a chip to show only that request.
Allocate Attendants
Allocate Attendants is for housekeeping supervisors. It shares out the day's rooms between room attendants.
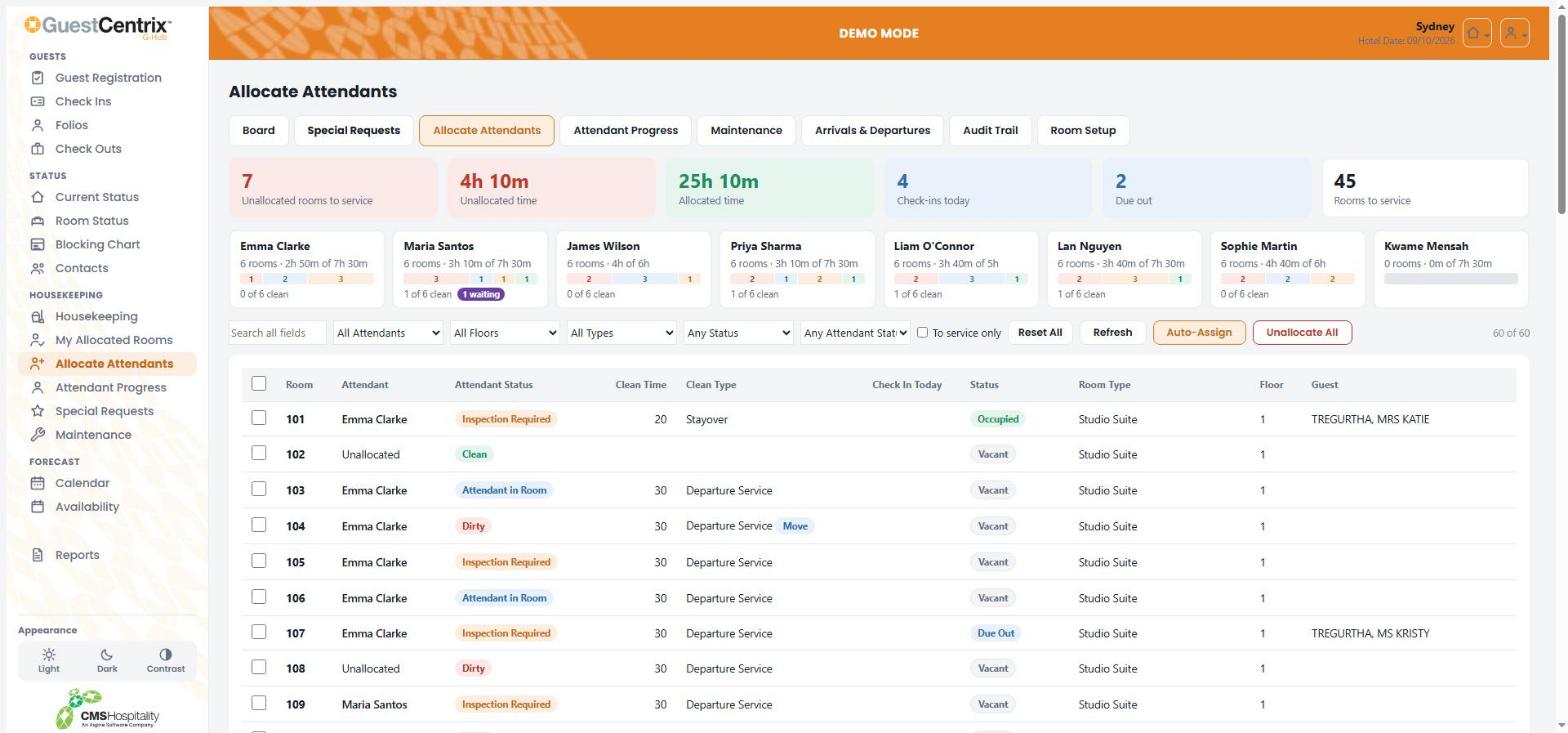
- The tiles at the top show unallocated rooms and time, allocated time, check-ins and departures.
- Each attendant's card shows how many rooms and how much time they have, against the hours they are available.
- Tick rooms in the list and choose an attendant to allocate them.
- Auto-Assign shares unallocated rooms between available attendants. Unallocate All clears all allocations.
Attendant Progress
Attendant Progress shows how far each room attendant has got through their rooms today.
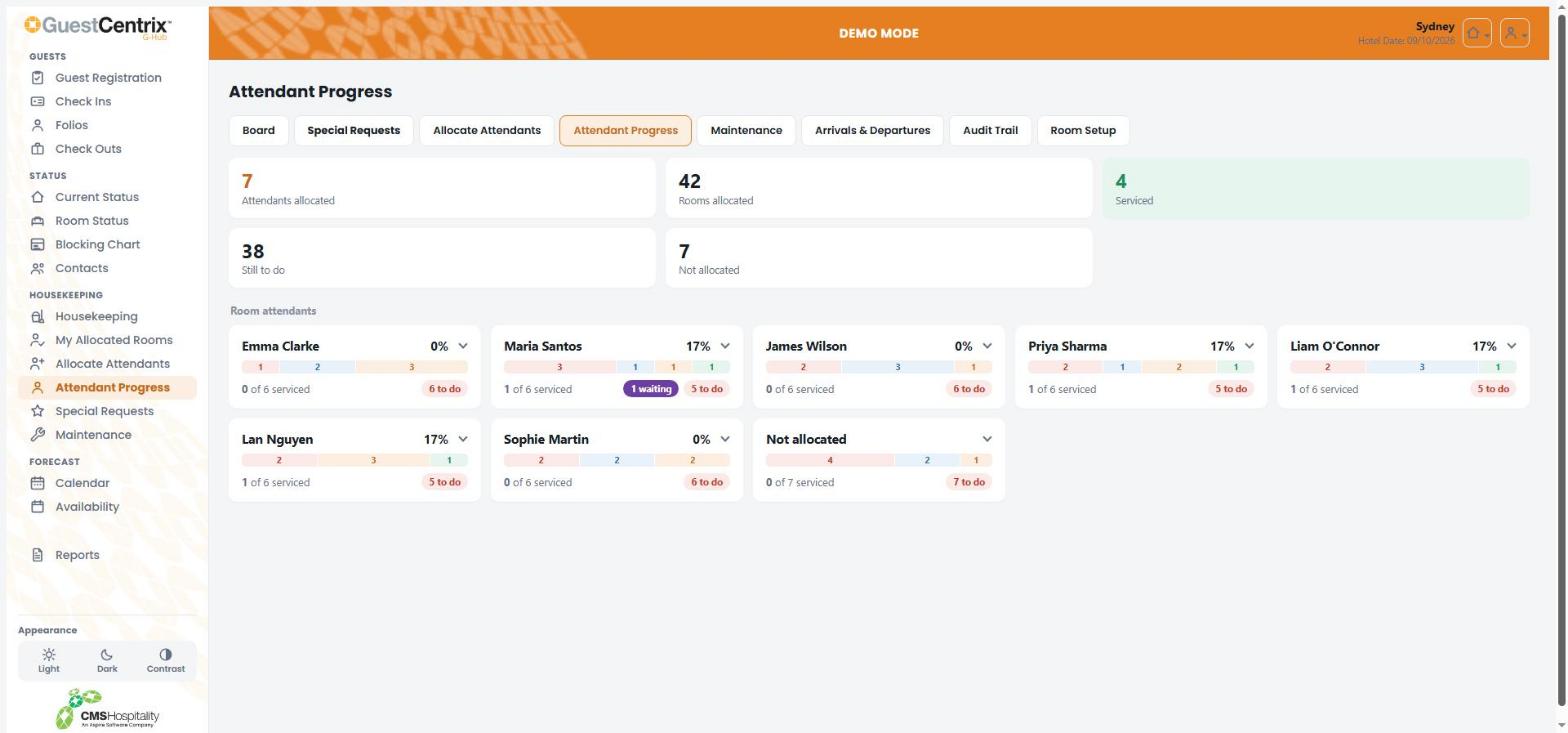
Each card shows the attendant's percentage complete, a bar of their rooms by status, and how many rooms are still to do. Select a card to see the attendant's rooms.
Maintenance
Note: The Repairs & Maintenance functions require the GuestCentrix Repairs & Maintenance module.
Use Maintenance to report a fault in a room or common area, and to see open issues.
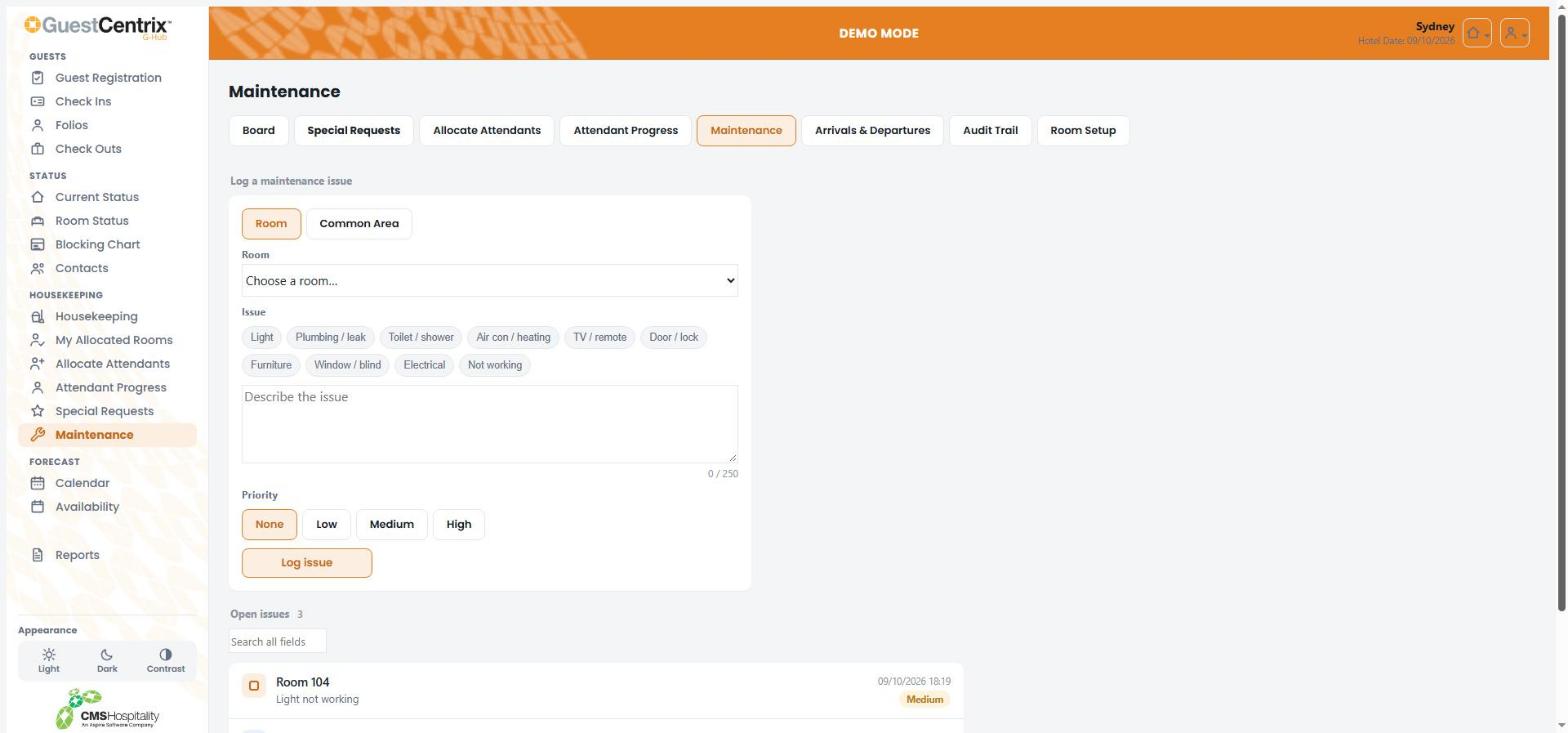
- Choose Room or Common Area, then select the room or area.
- Select an issue type, such as Light or Plumbing / leak, or describe the issue in your own words (up to 250 characters).
- Choose a Priority: None, Low, Medium or High.
- Select Log issue.
Open issues are listed below the form, with the date logged and priority.
Arrivals & Departures
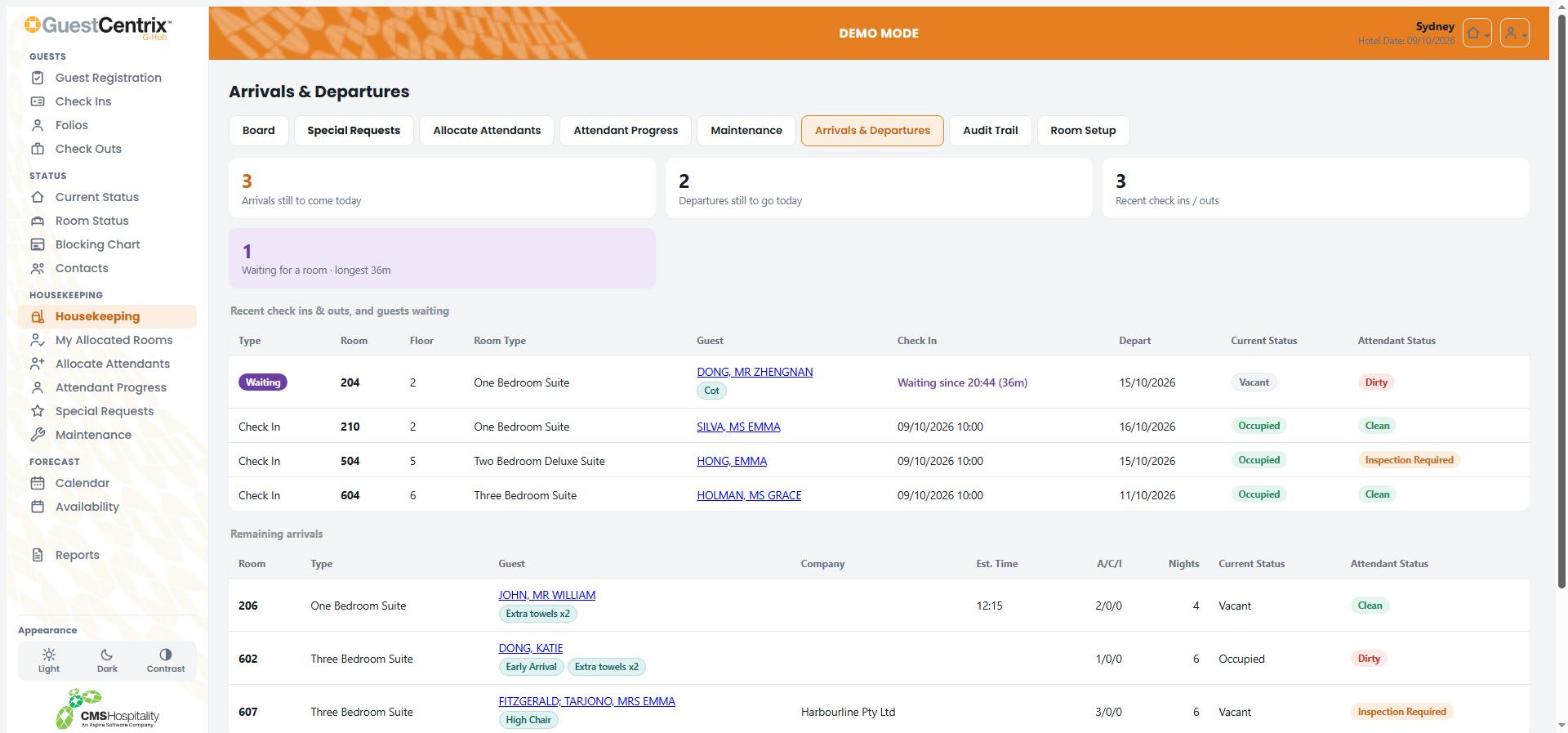
Arrivals & Departures shows recent check-ins and check-outs and the arrivals and departures still to come today, so housekeeping can prioritise rooms.
Audit Trail
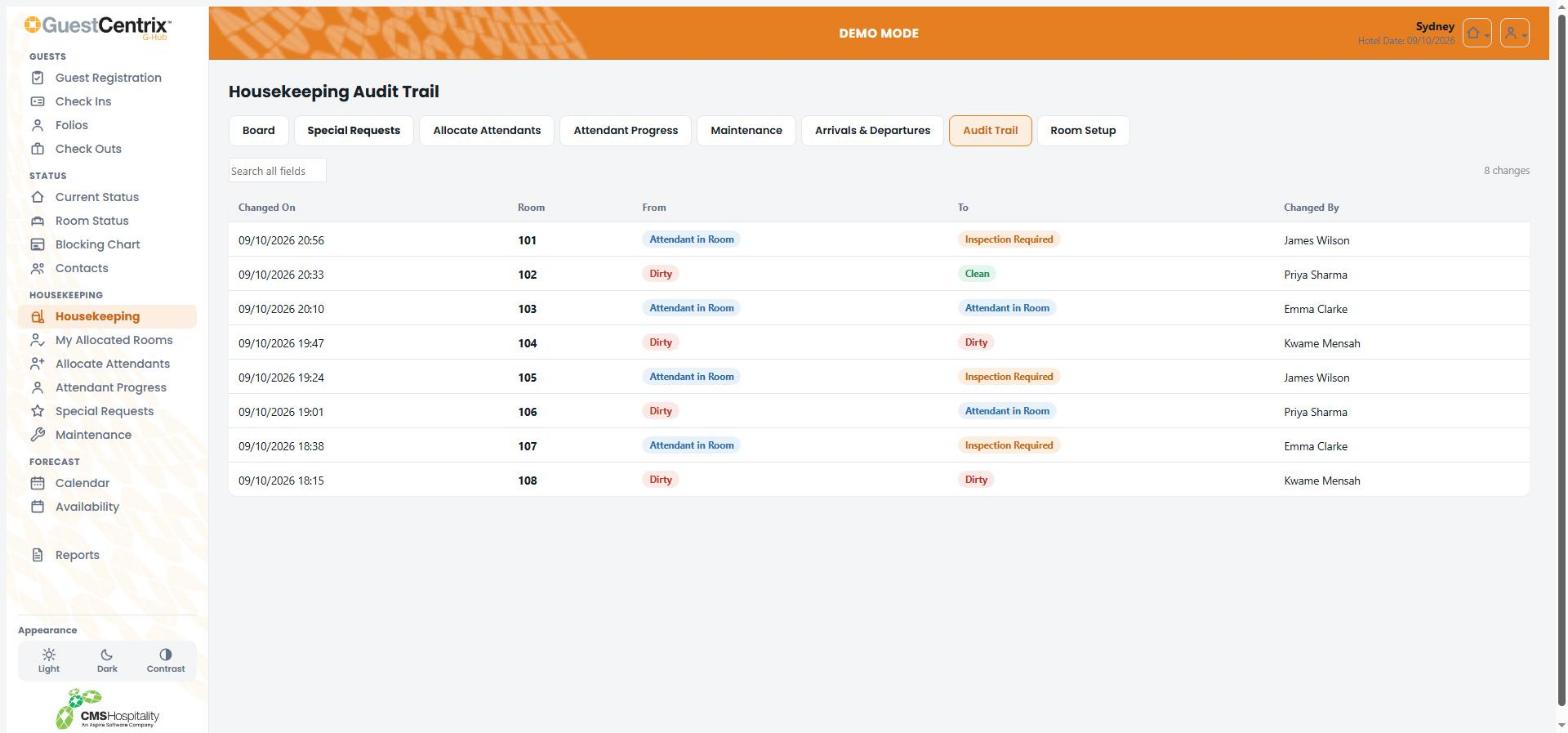
The Audit Trail lists every change of housekeeping status today: when it changed, the room, the old and new status, and who changed it.
Room Setup
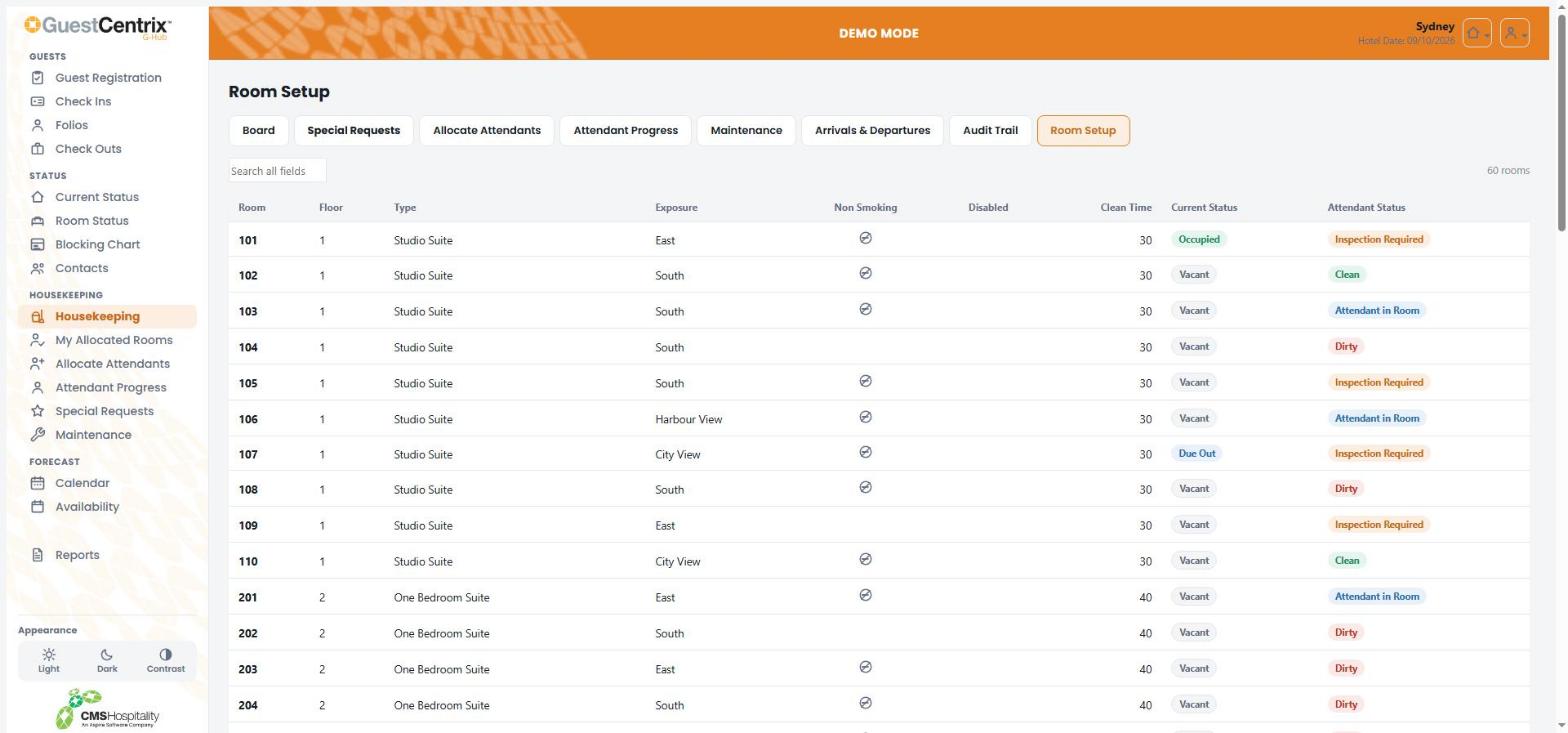
Room Setup is a read-only list of each room's configuration: floor, type, exposure, non-smoking, disabled access and standard cleaning time, with its current and attendant status.
Forecast
Calendar
The Calendar shows a month at a time. Each day shows rooms sold, occupancy percentage, rooms available and allotments.
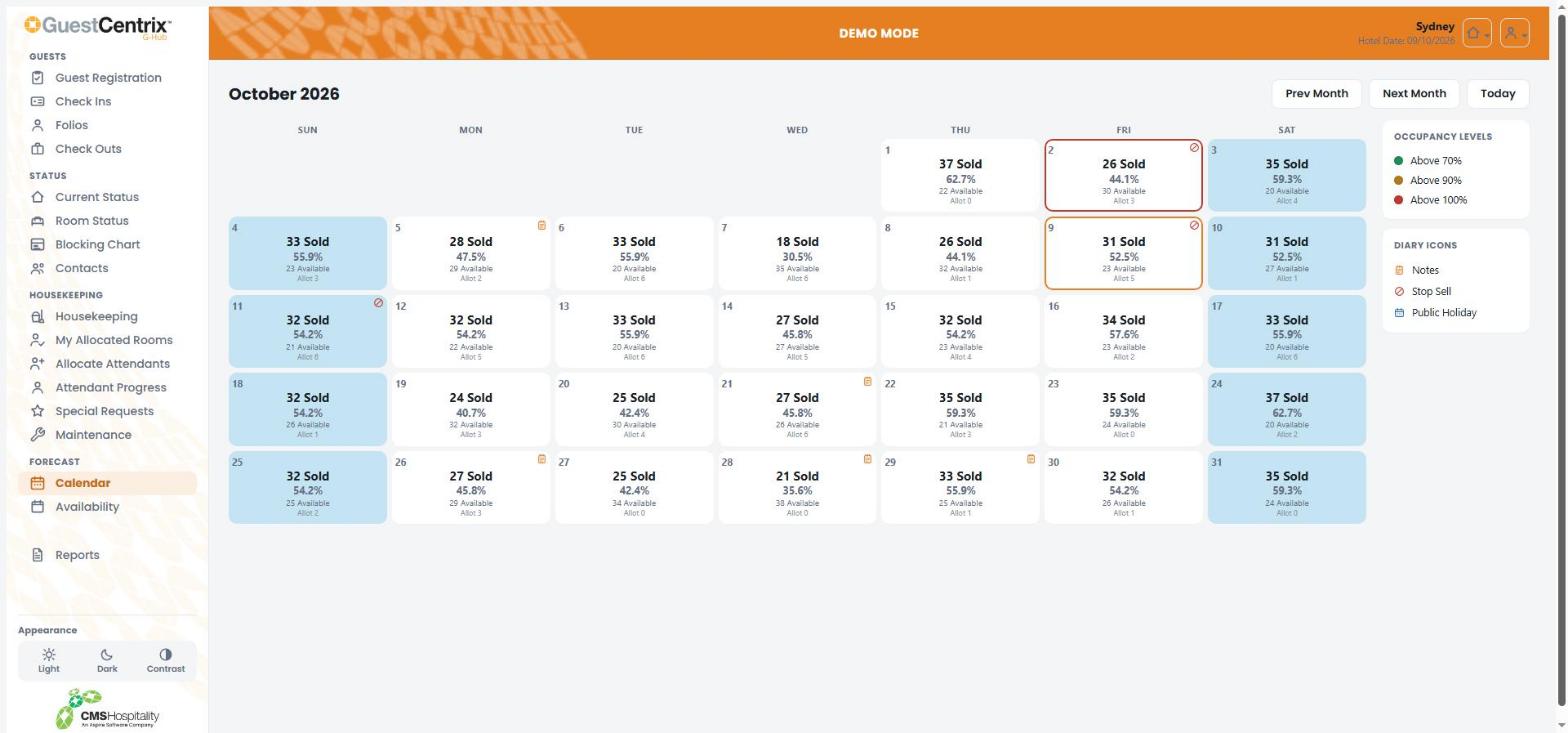
- Use Prev Month, Next Month and Today to move between months.
- A coloured border marks high occupancy: green above 70%, amber above 90% and red above 100%.
- Icons in the corner of a day mark diary notes, stop-sell days and public holidays.
Availability
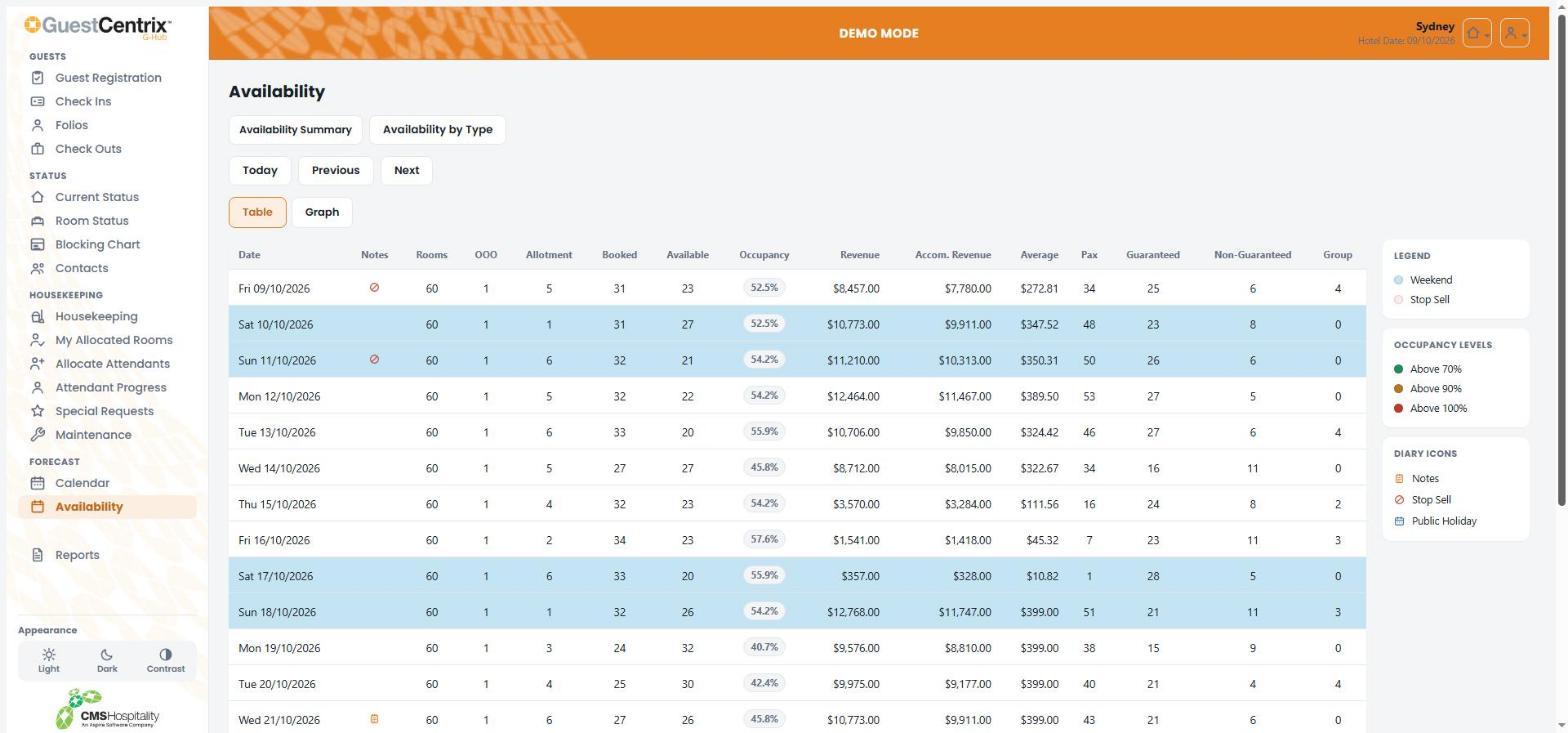
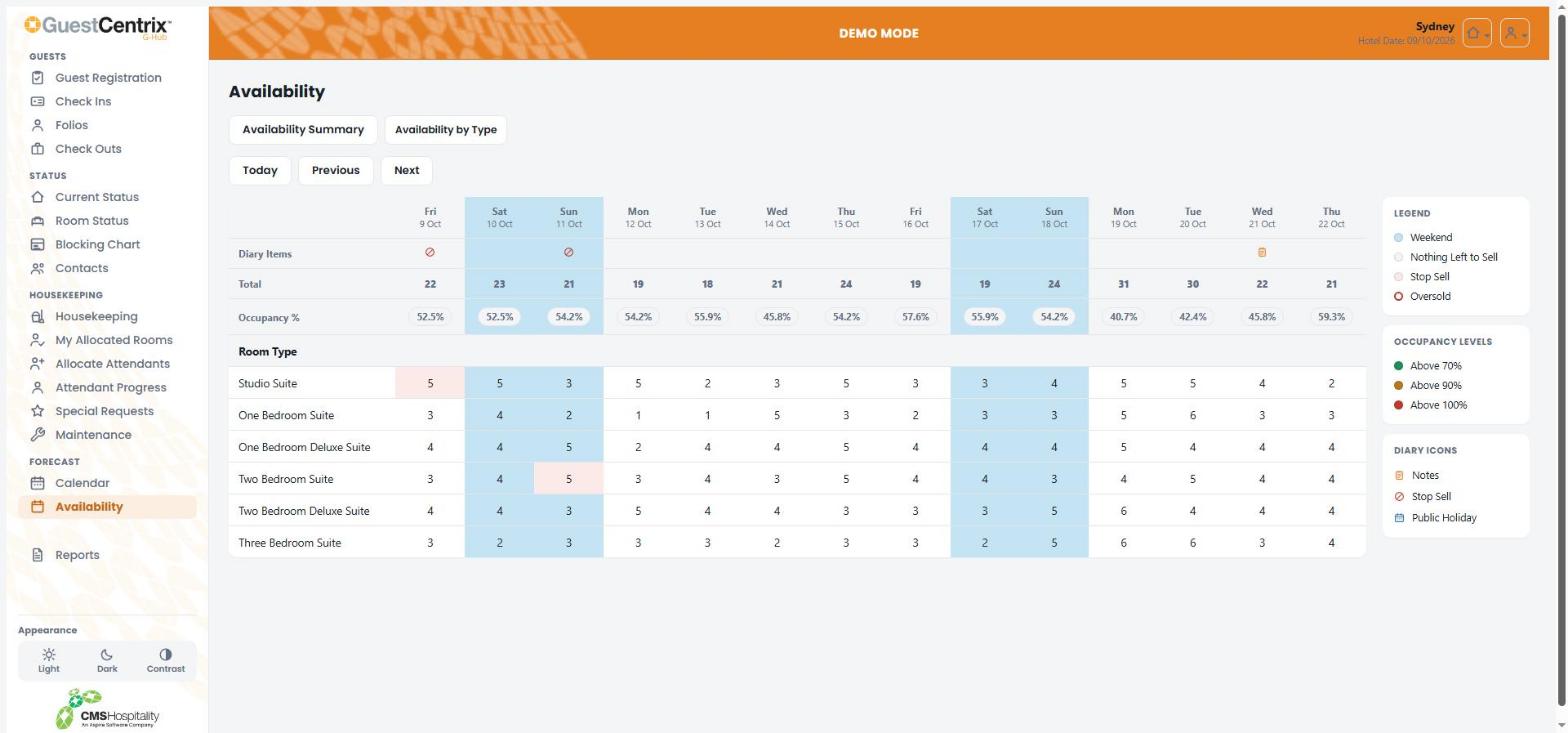
Availability has two views. Use the buttons at the top to switch between them, and Today, Previous and Next to move through the dates.
Availability Summary
Availability Summary shows a row for each day with rooms, out of order, allotments, rooms booked and available, occupancy, revenue, accommodation revenue, average rate, guests and guaranteed and non-guaranteed bookings. Select Graph to see the same figures as a chart.
Availability by Type
Availability by Type shows how many rooms of each room type are available on each day. Shading marks weekends, stop-sell days and room types with nothing left to sell; a red outline marks room types that are oversold.
Reports
Reports gives access to your property's report library, grouped into folders such as Daily Operations, Housekeeping, Forecast & Statistical and Finance & Accounts. Select a folder to see its reports, or use Search to find a report by name.
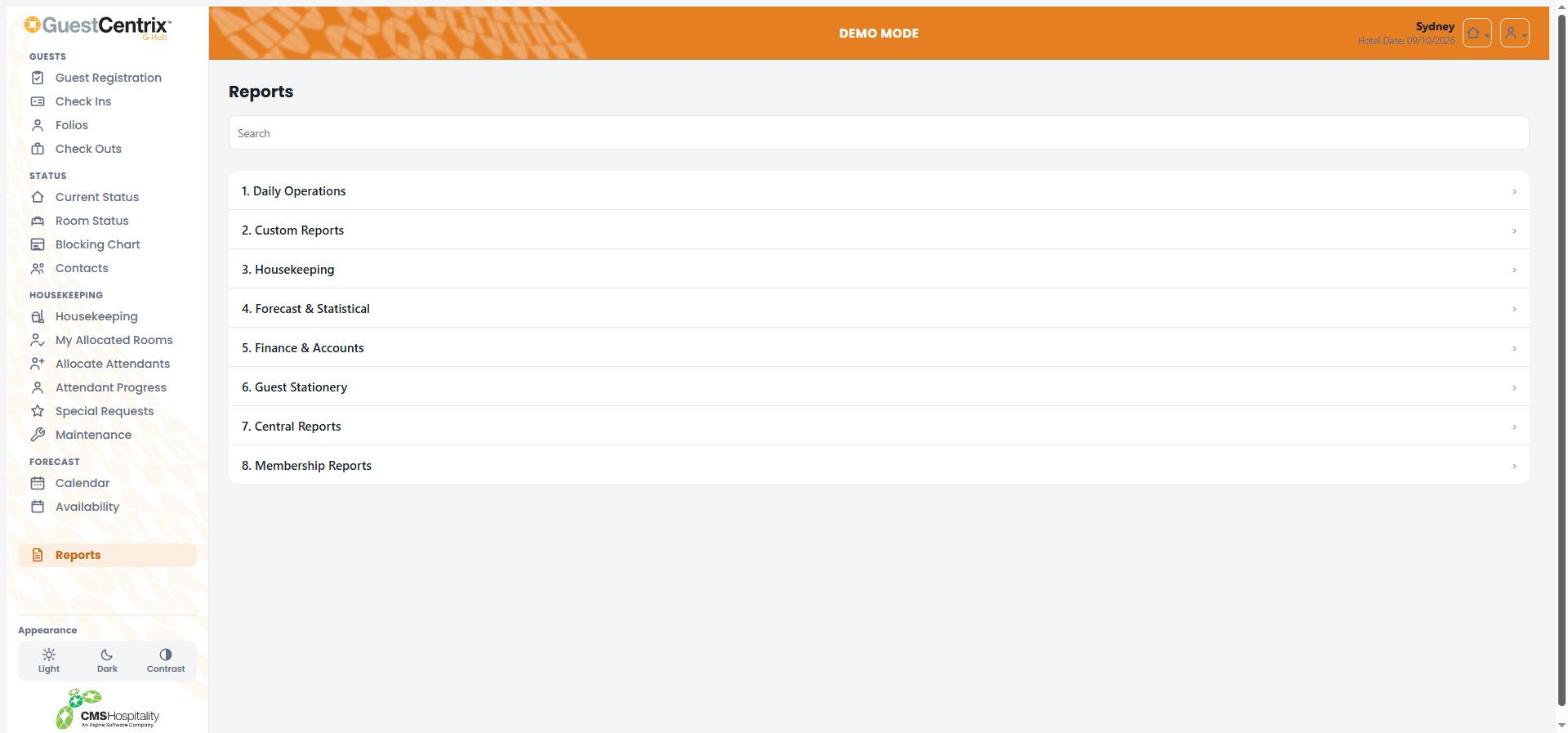
Select a report to choose its options and run it. Reports open in a viewer, where you can print or export them.
Your account
Changing your password
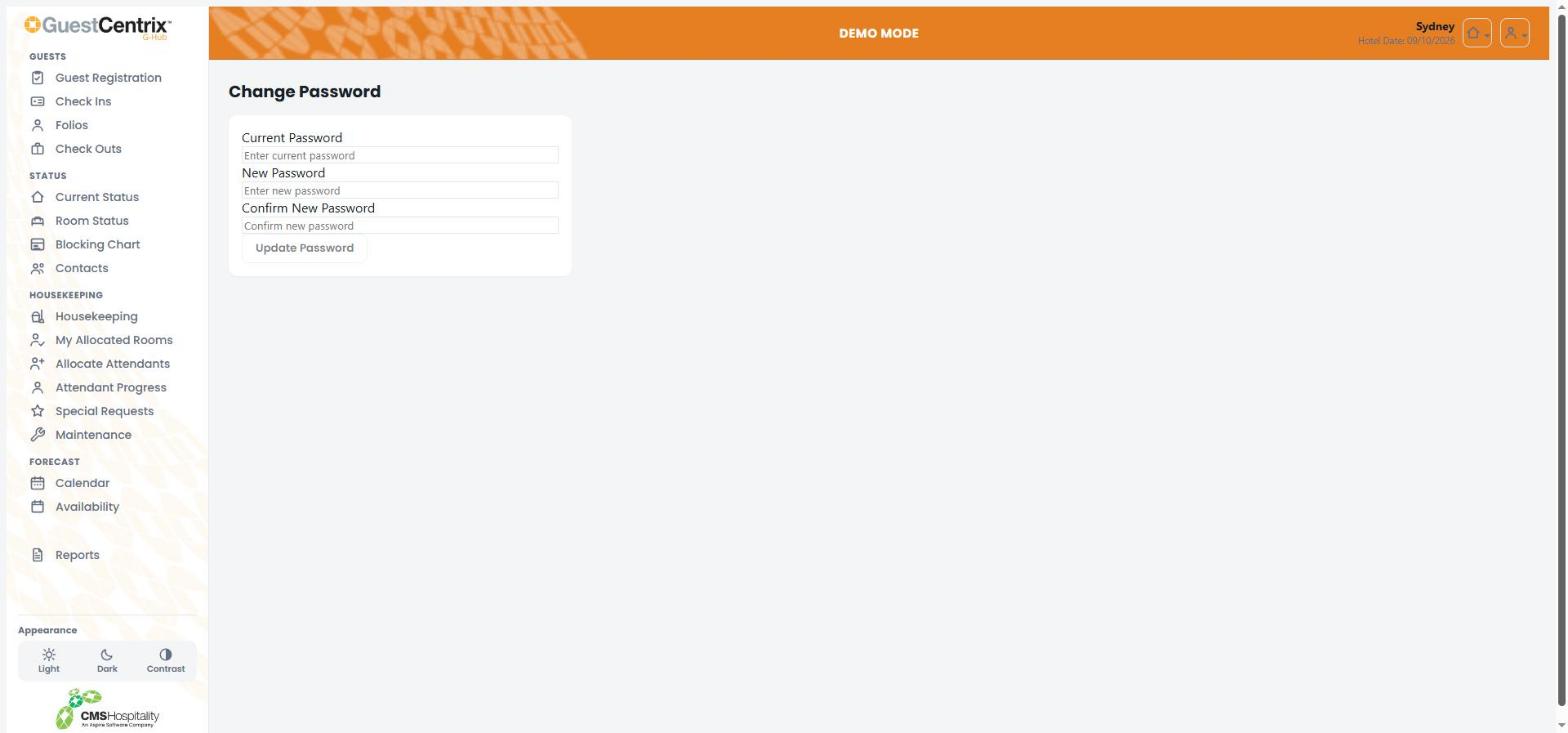
- Open the user menu at the top right and select Change Password.
- Enter your Current Password.
- Enter your New Password, then type it again in Confirm New Password.
- Select Update Password.
Logging out
Open the user menu at the top right and select Logout. Always log out on a shared computer or phone.
Note: For security, G-Hub logs you out automatically after a period of inactivity.
Status reference
Current status
Status | Meaning |
|---|---|
Vacant | No guest is staying in the room tonight. |
Occupied | A guest is checked in to the room. |
Due Out | The guest in the room is due to check out today. |
Out of Order | The room cannot be sold, for example while it is being repaired. |
Attendant status
Status | Meaning |
|---|---|
Dirty | The room needs servicing. |
Attendant in Room | A room attendant is servicing the room now. |
Inspection Required | Servicing is finished and the room is waiting for a supervisor to inspect it. |
Clean | The room is clean and ready for a guest. |
Registration status
Status | Meaning |
|---|---|
Accepted | The guest has signed the registration card and accepted the terms and conditions. |
Not Signed | The guest has not yet signed the registration card. |
GuestCentrix GHub User Guide · Version 7.4.2 · 9 October 2026